“How to screen record on Android” is a common query for many Android users who wish to capture and share their device’s screen activities. Screen recording can be immensely useful for creating tutorials, sharing gameplay, troubleshooting issues, and much more. In this blog post, we will walk you through various methods to screen record on Android, along with some recommended third-party apps for a seamless experience. So, let’s dive in and learn how to unleash the power of screen recording on your Android device.
How to Record Your Screen on Android
Screen recording on your Android device can be a valuable tool for capturing and sharing your activities with others. Whether you want to create tutorials, share gameplay, or troubleshoot issues, recording your screen is a simple process. Follow these step-by-step instructions to start recording your Android screen:
1. Launch the Screen Recording Feature
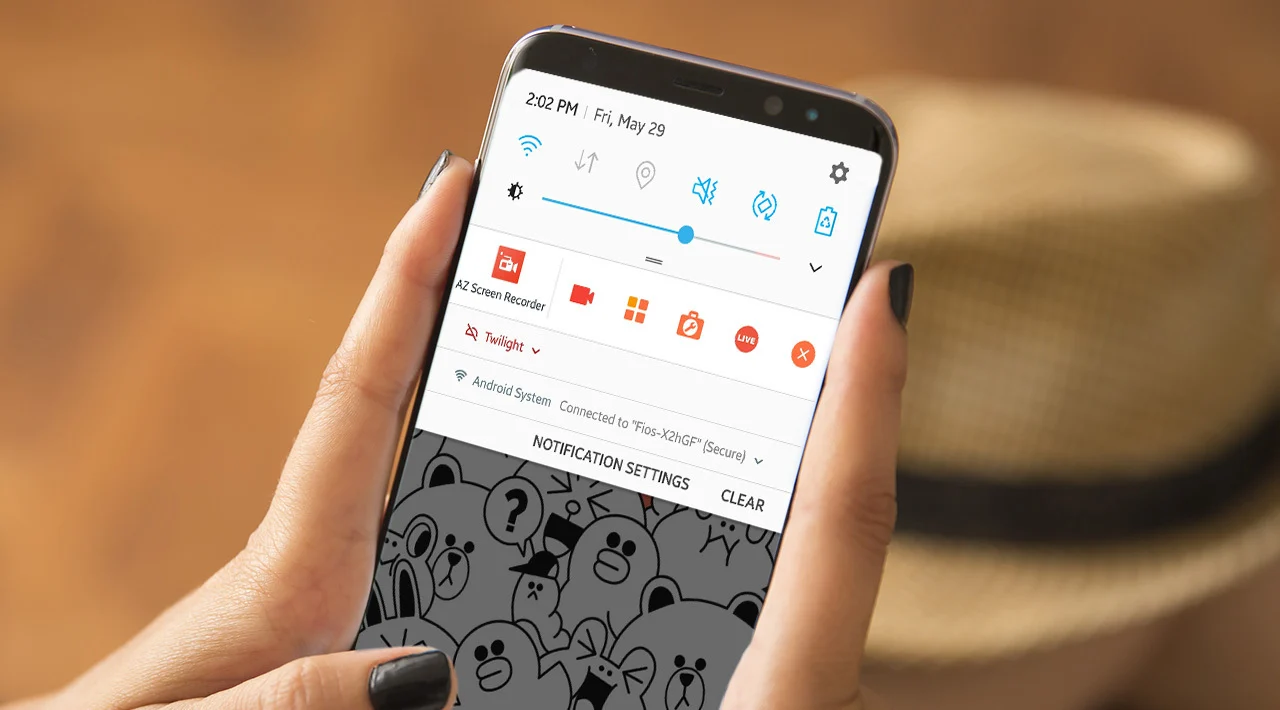
- To begin, access the Quick Settings menu by swiping down from the top of your screen.
- Look for the “Screen Recorder” icon among the quick toggle options. Note that the icon might vary slightly depending on your Android version and device manufacturer.
- Tap the “Screen Recorder” icon to initiate the recording process.
2. Customize Settings (Optional)
- Some Android devices offer additional settings for screen recording, allowing you to customize the recording experience based on your preferences.
- To access these settings, long-press the “Screen Recorder” icon, or go to Settings > Display > Advanced > Screen recording.
- In this menu, you may have options to adjust the video resolution, choose the audio source (internal audio, microphone, or both), and enable or disable other features like showing touches on the screen.
3. Start and Stop Recording
- Once you tap the “Screen Recorder” icon, a countdown timer might appear, giving you a moment to prepare.
- After the countdown, the screen recording will begin, capturing everything that happens on your device’s screen.
- To stop the recording, either tap the “Stop” button in the notification panel, or return to the Quick Settings menu and tap the “Screen Recorder” icon again.
4. Access Your Screen Recordings
- By default, Android saves your screen recordings in the “Gallery” app or the “Photos” app, depending on your device’s settings.
- Open the respective app and look for a folder named “Screen Recordings” or “Recordings.”
5. Edit Your Screen Recordings (Optional)
- If you wish to make adjustments or enhance your screen recordings, you can use the built-in video editor on your Android device.
- In the “Gallery” app or the “Photos” app, locate the recording you want to edit and select it.
- Tap on the “Edit” or “Trim” option to access basic editing features like trimming the video or cutting out unnecessary sections.
- Save the edited video, and it will replace the original recording in the “Screen Recordings” folder.
Tips for an Optimal Screen Recording Experience:
- Make sure your device has enough storage space before initiating a recording session.
- For the best results, record in a well-lit environment and avoid excessive background noise.
- If your Android device doesn’t have a built-in screen recording feature, consider using one of the third-party apps mentioned in another section of this blog post.
Screen Record on Android With a Third-Party App
While many modern Android devices come equipped with built-in screen recording features, some older devices or customized Android versions might lack this functionality. Fortunately, numerous third-party apps offer excellent screen recording capabilities, often with additional features and customization options. If you’re looking for a seamless and feature-rich screen recording experience, consider using one of the following third-party apps:
1. AZ Screen Recorder
AZ Screen Recorder is a highly-rated and popular choice among Android users for screen recording. It offers a user-friendly interface and a wide range of features to enhance your recording experience. Some of its key features include:
- High-Quality Recording: AZ Screen Recorder allows you to capture your screen in high-definition resolution, ensuring your recordings are crisp and clear.
- Pause and Resume Recording: You can pause and resume your recording sessions seamlessly, which is particularly useful for creating tutorials or editing videos later.
- Video Editing: The app comes with basic video editing tools, allowing you to trim, merge, and add text or annotations to your recordings.
- No Watermarks: AZ Screen Recorder offers clean recordings without any watermarks, maintaining the professional quality of your videos.
2. ScreenCam Screen Recorder
ScreenCam Screen Recorder is another excellent option for Android screen recording. This app offers smooth and reliable performance, making it ideal for capturing gameplay or creating instructional content. Some notable features of ScreenCam Screen Recorder include:
- Adjustable Frame Rates and Bitrates: You can customize the frame rate and bitrate of your recordings, giving you greater control over the video quality and file size.
- External Audio Support: ScreenCam allows you to record not only the device’s internal audio but also external audio using the microphone, making it suitable for commentary or reactions.
- No Time Limits: Unlike some free screen recording apps, ScreenCam does not impose any time limits on your recordings, allowing you to capture longer sessions without interruption.
3. Mobizen Screen Recorder
Mobizen Screen Recorder is a versatile app that goes beyond simple screen recording. It offers various features to enhance your recording experience and create engaging content. Key features of Mobizen Screen Recorder include:
- Face-Cam Recording: With Mobizen, you can capture your reactions and add a front-facing camera feed to your screen recording, making it ideal for vlogs and reaction videos.
- Basic Video Editing: The app includes a built-in video editor with features like trimming, cutting, and adding background music to your recordings.
- Real-Time Drawing: During the recording process, you can draw on the screen to highlight important points or add annotations to your videos.
4. ADV Screen Recorder
ADV Screen Recorder is a straightforward yet powerful app that caters to users who seek simplicity and effectiveness. It offers some unique features not found in other screen recording apps. Some of its key features include:
- Dual-Engine Recording: ADV Screen Recorder allows you to record using two engines – default and advanced. The advanced engine provides higher quality and smoother recordings.
- Screen Drawing: You can draw on the screen while recording to emphasize specific elements or create more interactive tutorials.
- Trimming and Sharing: After recording, you can instantly trim your video and share it across various platforms.
Why Should I Record My Android Screen
Screen recording on your Android device can serve various practical and creative purposes. Whether you are a content creator, a tech enthusiast, or someone who loves to share experiences, screen recording offers numerous benefits. Let’s explore some compelling reasons why you should consider recording your Android screen:
1. Creating Engaging Tutorials and Guides
Screen recording is a fantastic tool for creating step-by-step tutorials and guides. Whether you want to demonstrate how to use a new app, navigate through complex settings, or showcase hidden features, a screen recording allows you to visually guide your audience with clarity. Tutorials are not only helpful for others, but they can also establish you as an expert in your field.
2. Sharing Memorable Gameplay Moments
Are you an avid mobile gamer? Screen recording is a great way to capture and share your gaming triumphs, funny moments, or challenging achievements. Whether you’re playing casual games or competitive titles, recording your gameplay allows you to relive those memorable moments and share them with friends, family, or your gaming community.
3. Troubleshooting and Tech Support
When you encounter issues with your Android device or an app, explaining the problem to others can sometimes be challenging. By recording your screen while reproducing the issue, you can provide clear visual evidence of the problem to tech support or online communities. This makes it easier for others to understand the problem and offer accurate solutions.
4. Showcasing App Demonstrations and Reviews
For bloggers, app reviewers, or tech enthusiasts, screen recording is an invaluable tool for showcasing app demonstrations and reviews. By recording your interactions with an app, you can give your audience a hands-on experience, highlighting key features and functionalities. This enables your viewers to make informed decisions about whether the app suits their needs.
5. Recording Video Calls and Conversations
Screen recording is also handy for capturing video calls, interviews, or important conversations. Whether it’s a personal chat with loved ones or a professional discussion, recording the screen ensures you can revisit and cherish those moments later.
6. Collaborative Projects and Presentations
If you’re working on collaborative projects or giving presentations, screen recording can be beneficial. You can record your presentation, including slides and your voice narration, and share it with your team or audience. This is especially helpful for remote teams or situations where live presentations are not possible.
7. Documenting App and System Errors
When you encounter app crashes, software errors, or unexpected behavior on your Android device, screen recording can act as a valuable log. Recording the error in action helps you or others identify patterns and provides developers with visual evidence for troubleshooting and debugging.
8. Creating Memorable Memories
Lastly, screen recording is a wonderful way to capture and preserve precious memories. Whether it’s a video call with a loved one, a funny moment with your pet, or a heartwarming conversation, recording your screen allows you to relive those cherished moments whenever you want.
How to Open and Edit Your Screen Recording
After successfully recording your Android screen, the next step is to access and edit the recorded video. This process allows you to refine the content, trim unnecessary parts, and add annotations or enhancements to create polished and engaging videos. Let’s walk through the steps to open and edit your screen recording:
1. Accessing Your Screen Recordings
By default, Android saves your screen recordings in a specific location on your device. To access your recorded videos, follow these steps:
- Open the “Gallery” app or the “Photos” app on your Android device.
- Look for a folder named “Screen Recordings” or “Recordings.” Your screen recordings will be stored inside this folder.
- Tap on the desired recording to open and view it.
2. Editing Your Screen Recording
After accessing your screen recording, you may want to make adjustments and edits to enhance its quality and content. For basic editing, you can use the built-in video editor on your Android device. Here’s how:
- Trimming the Video: If your screen recording has unnecessary sections at the beginning or end, you can trim them off to focus on the essential content.
a. Tap on the screen recording to open it in the video player.
b. Look for the editing options, usually represented by a scissors or edit icon.
c. Drag the handles on the timeline to select the portion you want to keep.
d. Once you’ve made your selection, tap the “Trim” or “Cut” button to apply the changes. The trimmed video will be saved as a separate file.
- Adding Text or Annotations: To make your screen recording more informative, you can add text or annotations to highlight important points.
a. Some video players have a built-in feature for adding text or annotations directly. Look for an icon or option that allows you to do this.
b. Alternatively, you can use third-party video editing apps from the app store that offer more advanced text and annotation features.
- Adding Background Music or Audio: To make your video more engaging, you can add background music or audio to accompany your screen recording.
a. Use a video editing app that supports audio tracks to import the desired music or audio clip.
b. Adjust the volume and position of the audio to complement your video.
- Merging Multiple Clips (Optional): If you have multiple screen recording clips you’d like to combine, some video editing apps allow you to merge them into a single video.
a. Import all the clips into the video editing app.
b. Arrange the clips in the desired order on the timeline.
c. Save the merged video as a new file.
3. Saving Your Edited Screen Recording
Once you’ve made the desired edits and enhancements, you can save the edited video as a separate file. Most video editing apps provide an option to “Save” or “Export” the edited video to your device’s storage.
Conclusion
Screen recording on Android devices is a valuable and versatile feature that empowers users to capture, share, and enhance their screen activities. Whether you want to create informative tutorials, share exciting gameplay moments, troubleshoot issues, or simply preserve cherished memories, screen recording provides an easy and effective solution.
For users with newer Android devices, the built-in screen recording option offers a convenient way to capture on-screen actions without the need for additional apps. With just a few taps, you can record your screen and access the videos in the “Screen Recordings” or “Recordings” folder.
For those whose devices lack built-in screen recording or prefer more advanced features, third-party apps offer a wide range of possibilities. Apps like AZ Screen Recorder, DU Recorder, ScreenCam Screen Recorder, Mobizen Screen Recorder, and ADV Screen Recorder provide various customization options, video editing tools, and even live streaming capabilities.
The benefits of screen recording extend to various areas of interest, such as content creation, troubleshooting, gaming, tutorials, and collaborations. By utilizing screen recording, users can engage their audiences, share experiences, and offer valuable insights to others.
With the power of screen recording at your fingertips, there are virtually no limits to what you can achieve. Whether you’re a seasoned content creator, a tech enthusiast, or someone who loves sharing experiences, screen recording on Android is a feature that opens up a world of possibilities. So, go ahead and unleash your creativity and productivity by embracing the incredible capabilities of screen recording on your Android device. Happy recording!
- SEO Powered Content & PR Distribution. Get Amplified Today.
- PlatoData.Network Vertical Generative Ai. Empower Yourself. Access Here.
- PlatoAiStream. Web3 Intelligence. Knowledge Amplified. Access Here.
- PlatoESG. Automotive / EVs, Carbon, CleanTech, Energy, Environment, Solar, Waste Management. Access Here.
- BlockOffsets. Modernizing Environmental Offset Ownership. Access Here.
- Source: https://www.techpluto.com/how-to-screen-record-on-android/
- :has
- :is
- :not
- :where
- $UP
- 1
- 11
- 8
- a
- About
- access
- accessing
- accompany
- accurate
- Achieve
- achievements
- across
- Act
- Action
- actions
- activities
- add
- adding
- Additional
- adjustments
- advanced
- After
- again
- ahead
- All
- allow
- Allowing
- allows
- along
- also
- among
- an
- and
- android
- Another
- any
- app
- app store
- appear
- Apply
- apps
- ARE
- areas
- AS
- At
- audience
- audiences
- audio
- avoid
- background
- based
- basic
- BE
- before
- begin
- Beginning
- beneficial
- benefits
- BEST
- Beyond
- Blog
- both
- built-in
- but
- button
- by
- call
- Calls
- camera
- CAN
- capabilities
- capture
- Capturing
- casual
- caters
- challenging
- Changes
- cherish
- choice
- Choose
- clarity
- clear
- clips
- collaborations
- collaborative
- combine
- come
- comes
- Commentary
- Common
- Communities
- community
- compelling
- competitive
- Complement
- complex
- comprehensive
- conclusion
- Consider
- content
- content-creation
- control
- Convenient
- Conversation
- conversations
- countdown
- create
- Creating
- creation
- Creative
- creativity
- creator
- CRISP
- customization
- customize
- customized
- cutting
- decisions
- Default
- demonstrate
- Depending
- desired
- developers
- device
- Devices
- directly
- discussion
- Display
- do
- documenting
- does
- Doesn’t
- down
- draw
- during
- easier
- easy
- editing
- editor
- Effective
- effectiveness
- either
- elements
- embracing
- emphasize
- empowers
- enable
- enables
- encounter
- end
- engage
- engaging
- Engine
- Engines
- enhance
- enhancements
- enough
- ensures
- ensuring
- enthusiast
- enthusiasts
- Environment
- equipped
- error
- Errors
- especially
- essential
- establish
- Even
- everything
- evidence
- excellent
- exciting
- experience
- Experiences
- expert
- explaining
- explore
- extend
- external
- family
- fantastic
- Feature
- Features
- few
- field
- File
- Focus
- follow
- following
- For
- Fortunately
- found
- FRAME
- Free
- friends
- from
- functionalities
- functionality
- funny
- gameplay
- Games
- gaming
- Give
- Giving
- Go
- Goes
- great
- greater
- guide
- Guides
- Handles
- hands-on
- handy
- happens
- happy
- Have
- helpful
- helps
- Hidden
- high-definition
- higher
- Highlight
- highlighting
- How
- How To
- http
- i
- ICON
- ideal
- identify
- if
- immensely
- import
- important
- impose
- in
- In other
- include
- includes
- Including
- incredible
- informative
- informed
- initiate
- initiating
- inside
- insights
- instantly
- instructional
- instructions
- interactions
- interactive
- interest
- Interface
- internal
- Interviews
- into
- invaluable
- issue
- issues
- IT
- ITS
- just
- Keep
- Key
- Lack
- later
- launch
- LEARN
- like
- limits
- live
- location
- log
- longer
- Look
- looking
- loved
- loves
- made
- maintaining
- make
- MAKES
- Making
- Manufacturer
- many
- May..
- memorable
- Memories
- mentioned
- Menu
- Merge
- methods
- microphone
- might
- Mobile
- Modern
- moment
- Moments
- more
- most
- much
- multiple
- Music
- my
- Named
- Navigate
- Need
- needs
- New
- new app
- next
- no
- Noise
- notable
- notification
- numerous
- numerous benefits
- of
- off
- offer
- Offers
- often
- older
- on
- once
- ONE
- ones
- online
- online communities
- only
- open
- opens
- optimal
- Option
- Options
- or
- order
- original
- Other
- Others
- out
- over
- panel
- particularly
- parts
- patterns
- pause
- performance
- personal
- pet
- Platforms
- plato
- Plato Data Intelligence
- PlatoData
- player
- players
- playing
- points
- Popular
- popular choice
- position
- possibilities
- possible
- Post
- power
- powerful
- Practical
- Precious
- prefer
- preferences
- Prepare
- presentation
- Presentations
- Problem
- process
- productivity
- professional
- projects
- provide
- provides
- purposes
- quality
- Quick
- range
- Rate
- Rates
- reaction
- reactions
- reasons
- recommended
- record
- recorded
- recording
- refine
- reliable
- Relive
- remote
- replace
- represented
- Resolution
- respective
- Results
- resume
- return
- Reviews
- Save
- saving
- Screen
- seamless
- seamlessly
- seasoned
- Section
- sections
- Seek
- selection
- separate
- serve
- session
- sessions
- settings
- Share
- sharing
- should
- showcase
- showcasing
- showing
- Simple
- simplicity
- simply
- single
- situations
- Size
- Slides
- smooth
- smoother
- So
- Software
- solution
- Solutions
- some
- Someone
- Source
- Space
- specific
- start
- Step
- Steps
- Stop
- storage
- store
- stored
- straightforward
- streaming
- Successfully
- such
- suitable
- support
- Supports
- sure
- system
- Tap
- Taps
- team
- teams
- tech
- that
- The
- their
- Them
- There.
- These
- they
- third-party
- this
- those
- Through
- time
- timeline
- titles
- to
- tool
- tools
- top
- tutorials
- two
- understand
- Unexpected
- unique
- unique features
- unleash
- unlike
- use
- user-friendly
- users
- using
- usually
- Utilizing
- Valuable
- various
- versatile
- version
- Video
- Videos
- View
- viewers
- virtually
- Voice
- volume
- want
- Way..
- we
- webp
- What
- whenever
- whether
- which
- while
- WHO
- whose
- why
- wide
- Wide range
- will
- with
- without
- wonderful
- working
- world
- yet
- you
- Your
- zephyrnet