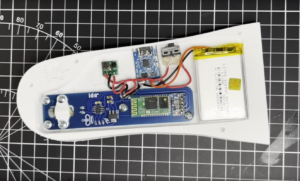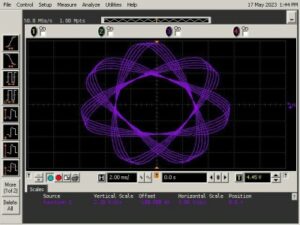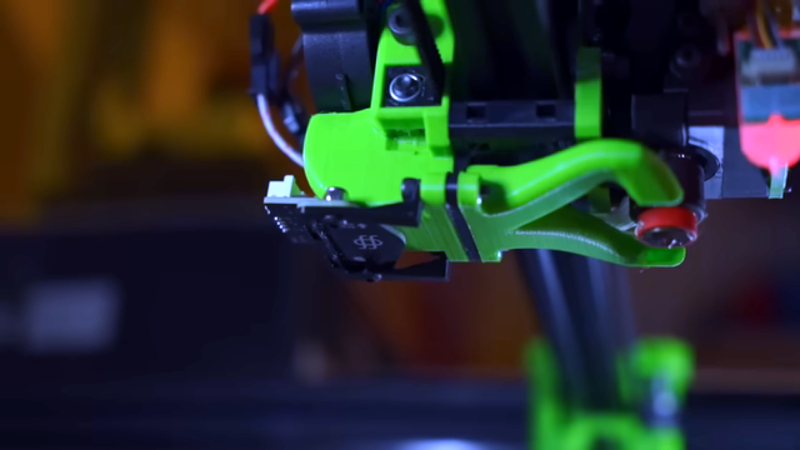
The bane of 3D printing is what people commonly call bed leveling. The name is a bit of a misnomer since you aren’t actually getting the bed level but making the bed and the print head parallel. Many modern printers probe the bed at different points using their own nozzle, a contact probe, or a non-contact probe and develop a model of where the bed is at various points. It then moves the head up and down to maintain a constant distance between the head and the bed, so you don’t have to fix any irregularities. [YGK3D] shows off the Beacon surface scanner, which is technically a non-contact probe, to do this, but it is very different from the normal inductive or capacitive probes, as you can see in the video below. Unfortunately, we didn’t get to see it print because [YGK3D] mounted it too low to get the nozzle down on the bed. However, it did scan the bed, and you can learn a lot about how the device works in the video. If you want to see one actually printing, watch the second, very purple video from [Dre Duvenage].
Generally, the issues with probes are making them repeatable, able to sense the bed, and the speed of probing all the points on the bed. If your bed is relatively flat, you might get away with probing only 3 points so you can understand how the bed is tilted. That won’t help you if your bed has bumps and valleys or even just twists in it. So most people will probe a grid of points.
Like a pixel is to a photograph, more points mean better accuracy. But it also means a lot more time since, traditionally, the printer has to move to each point and then push the sensor down toward the bed. Finding the measurement is most often a two-step process. You move fast to save time, find the bottom, back up a bit, and then find it again slowly to get better accuracy. This is necessary because the sensors don’t tell you how far away the bed is. They tell you you are near the bed or far away. So you have to move from far away to near and then stop.
The Beacon tells you how far the bed is with a claimed resolution of 0.5 microns and can sample at 1 kHz. That means you just stick the probe at some point near the bed and move over the entire bed at up to 500 mm/s, recording the distances you measure along the way. This means you can scan the bed much faster and model thousands of points.
The Beacon uses eddy currents in the bed, so the bed does need to be conductive. The company that makes them recommends bare steel with glue or a PEI coating. The plate has to be at least 400 microns thick and they warn that if you use a steel plate with a laminate, it won’t be able to sense deformations in the laminate itself, only the underlying metal. The probe is lightweight — under 4 grams — and operates up in ambient temperatures up to 110C.
If your bed attaches with magnets, you might wonder if it will affect the sensor. The answer is maybe. The company mentions that large fixed magnets can affect measurement. You can define an exclusion zone in the software, assuming that the magnets don’t eat up too much of the bed. However, the company also notes that the rubber sheet magnets typically found on print beds are actually many tiny magnets and won’t bother the sensor. You also need to mount it away from metal on your print head. The final requirement is to use Klipper since it will support the large number of points created by the sensor.
We used to resist not manually leveling the bed because it wears the printer’s Z axis, but we’ve given up and embraced it. We’ve seen another similar sensor, but it doesn’t scan — it measures in real-time.
- SEO Powered Content & PR Distribution. Get Amplified Today.
- Platoblockchain. Web3 Metaverse Intelligence. Knowledge Amplified. Access Here.
- Source: https://hackaday.com/2023/04/06/fast-scanning-bed-leveling/
- :is
- $UP
- 1
- 3d
- 3D Printing
- a
- Able
- About
- accuracy
- actually
- affect
- All
- Ambient
- and
- answer
- ARE
- AS
- At
- Axis
- back
- BE
- beacon
- because
- below
- Better
- between
- Bit
- Bottom
- by
- call
- CAN
- claimed
- commonly
- company
- constant
- contact
- content
- created
- develop
- device
- DID
- different
- distance
- Doesn’t
- Dont
- down
- each
- eat
- embedded
- Entire
- Even
- FAST
- faster
- final
- Find
- finding
- Fix
- fixed
- flat
- found
- from
- get
- getting
- given
- Grams
- Grid
- Have
- head
- help
- How
- However
- HTTPS
- in
- issues
- IT
- itself
- large
- LEARN
- Level
- lightweight
- Lot
- Low
- Magnets
- maintain
- MAKES
- Making
- manually
- many
- means
- measure
- measures
- mentions
- metal
- might
- model
- Modern
- more
- most
- MOUNT
- move
- moves
- name
- Near
- necessary
- Need
- normal
- Notes
- number
- of
- on
- ONE
- operates
- own
- Parallel
- People
- Pixel
- plato
- Plato Data Intelligence
- PlatoData
- Point
- points
- probe
- process
- Push
- real-time
- recommends
- recording
- relatively
- repeatable
- requirement
- Resolution
- rubber
- Save
- scan
- scanning
- Second
- sense
- sensors
- Shows
- since
- Slowly
- So
- Software
- some
- speed
- steel
- Stick
- Stop
- support
- Surface
- tells
- that
- The
- their
- Them
- thousands
- time
- to
- too
- toward
- traditionally
- true
- twists
- typically
- under
- underlying
- understand
- use
- various
- Video
- Watch
- Way..
- What
- which
- will
- with
- works
- Your
- youtube
- zephyrnet