Imagine de la autor
Ever wonder what you could do to look like a pro in front of your manager when using Git? In this post, we’ll learn about 10 advanced Git techniques and shortcuts that will make you more efficient at versioning, maintaining, and sharing code.
You likely already know the basics of committing, pushing, pulling, and branching with Git. But there are many lesser-known commands and features that can level up your skills. After reading this, you’ll have a few slick tricks up your sleeve to impress coworkers with your Git proficiency.
Ați adăugat și ați comis fișierele în acest fel de mai multe ori, dar dacă vă spun că se poate face într-o singură linie cu indicatorul `-am`?
$ git add .
$ git commit -m "new project"
Încercați acest lucru în schimb și va adăuga modificările fișierului și va crea commit-ul folosind mesajul.
$ git commit -am "new project"
[master 17d7675] new project
4 files changed, 2 insertions(+), 1 deletion(-)
You can rename your current commit message using the `–amend` flag and write the new message. This will help you with accidental messages.
$ git commit --amend -m "Love"
[master 7b7f891] Love
Date: Mon Jan 22 17:57:58 2024 +0500
4 files changed, 2 insertions(+), 1 deletion(-)
You can include additional changes to the current commit before pushing it to the remote repository. To do so, you need to add the file changes and then commit using the `–amend` flag. To retain the previous commit message, simply use the `–no-edit` flag.
$ git add .
$ git commit --amend --no-edit
[master f425059] Love
Date: Mon Jan 22 17:57:58 2024 +0500
6 files changed, 2 insertions(+), 34 deletions(-)
If you want to push a local commit and override the remote history without dealing with resolving issues, you can use the `–force` flag. However, it’s important to note that using the force flag is not recommended and should only be used when you’re absolutely sure of what you’re doing. Keep in mind that using the force flag will rewrite the remote history.
$ git push origin master --force
Enumerating objects: 7, done.
Counting objects: 100% (7/7), done.
Delta compression using up to 16 threads
Compressing objects: 100% (4/4), done.
Writing objects: 100% (4/4), 357 bytes | 357.00 KiB/s, done.
Total 4 (delta 2), reused 0 (delta 0), pack-reused 0
remote: Resolving deltas: 100% (2/2), completed with 2 local objects.
To https://github.com/kingabzpro/VSCode-DataCamp.git
8f184d5..f425059  master -> master
Pentru a anula o comitere în Git, puteți folosi comanda `revert`. Cu toate acestea, această comandă nu elimină nicio comitere. În schimb, creează un nou commit care anulează modificările făcute de commit-ul original.
We will use the `log` with `–oneline` flag to view commit history in a shorter form.
$ git log --oneline
f425059 (HEAD -> master, origin/master) Love
8f184d5 first commit
Pentru a reveni la o comitere anterioară, folosim comanda `git revert` urmată de ID-ul de comitere. Acest lucru creează un nou commit cu modificările de la precedentul commit.
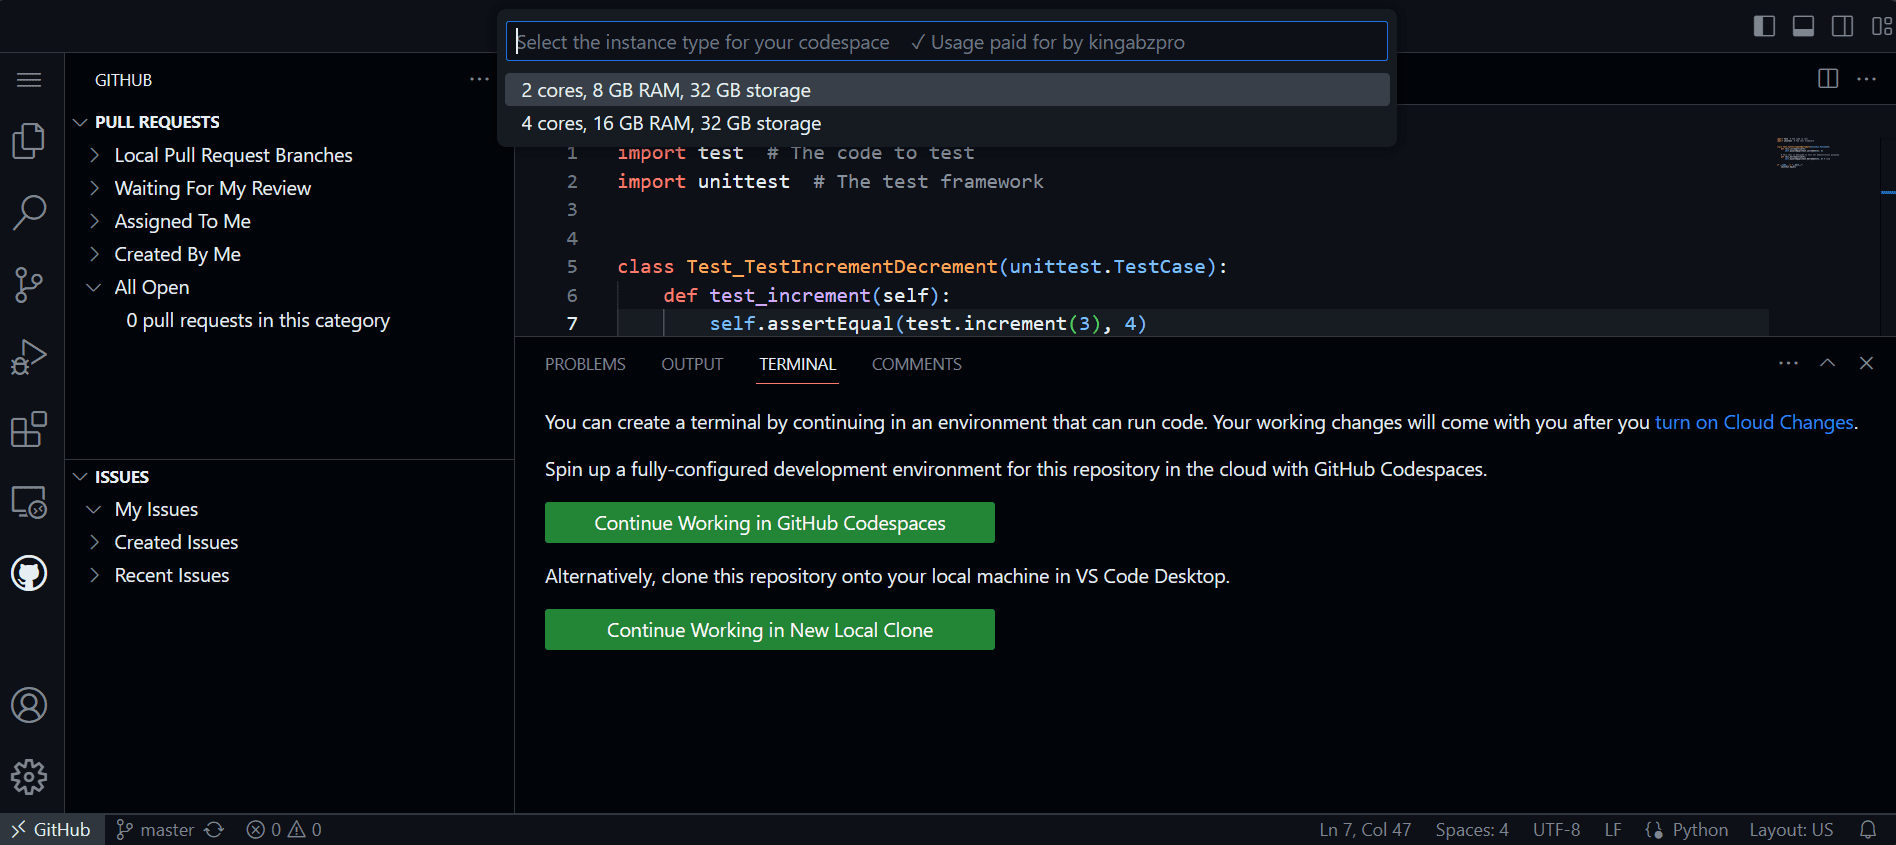
$ git revert 8f184d5Doriți să vă creșteți productivitatea pe GitHub? Cu Spații de cod GitHub, acum puteți edita și rula codul direct în browser.
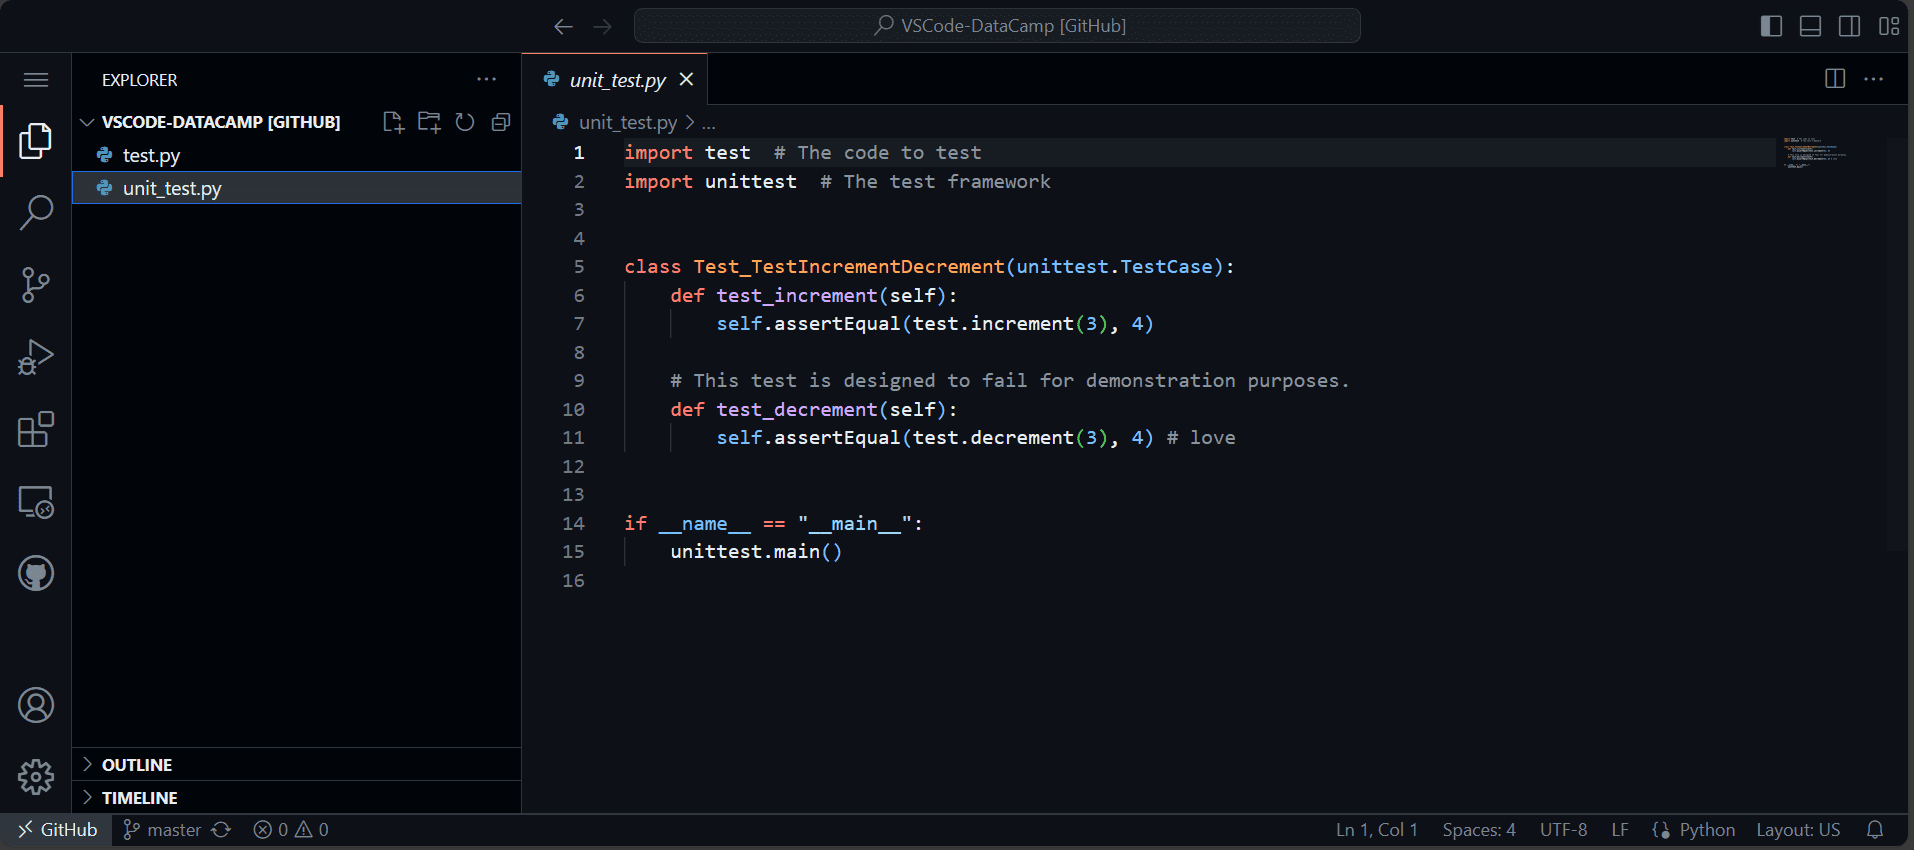
To access this feature, simply navigate to your favorite repository, press the period key (“.”) on your keyboard, and it will redirect you to the VSCode UI.
Imagine de la autor
You can make changes to the code and push them to your remote repository. However, if you want to run the code in the terminal, you need to run the Codespace in the cloud. The free version offers an excellent option for running your Python code in your browser. Isn’t that awesome? I just found out about it today.
Imagine de la autor
Când lucrați la un proiect, puteți adăuga fișiere într-o zonă de pregătire și apoi le puteți angaja pentru a salva progresul curent. Cu toate acestea, există o altă modalitate de a vă salva munca cu ușurință folosind comanda `stash`. Când utilizați `stash`, vă salvați progresul curent fără să-l adăugați în zona de punere în scenă sau să îl efectuați. Acest lucru vă permite să vă salvați progresul și să îl restaurați oricând este necesar.
Vom salva progresul nostru actual furnizând un nume și ascunzându-l.
$ git stash save new-idea
Saved working directory and index state On master: new-idea
Puteți vizualiza lista de stocuri și puteți nota indexul corespunzător pentru a o recupera.
$ git stash list
stash@{0}: On master: new-idea
Our stash of “new ideas” is saved at index 0. To retrieve it, use this command:
$ git stash apply 0
On branch master
Your branch is up to date with 'origin/master'.
You have the option to rename your default branch name to something more appropriate. In this case, we will rename “master” to “main”.
$ git branch -M main

Puteți verifica modificările folosind următoarea comandă:
$ git status
On branch main
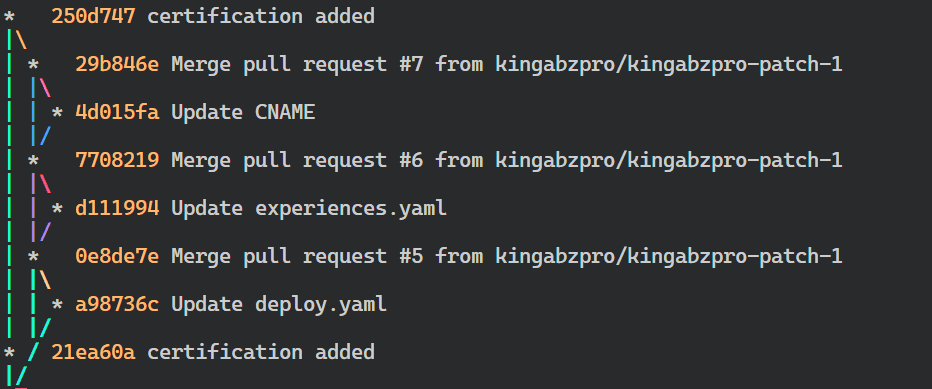
Your branch is up to date with 'origin/master'.Dacă doriți să vizualizați un istoric detaliat al tuturor commit-urilor făcute în depozitul curent, puteți utiliza comanda `git log`. Cu toate acestea, rezultatul poate fi dificil de citit. Pentru a o face mai lizibilă, puteți folosi steagurile „grafic”, „decorare” și „linie unică”. Aceasta va afișa modificările făcute în mai multe ramuri și modul în care acestea se îmbină.
$ git log --graph --decorate --oneline
În mai multe rânduri, am trecut la o nouă ramură și am uitat numele ramurii anterioare. În consecință, a trebuit să folosesc comanda `git branch -a` pentru a vedea lista de nume de ramuri. Cu toate acestea, există o modalitate mai simplă de a reveni la ramura originală folosind liniuța „-” după comanda `git checkout`.
Mai întâi vom crea noua ramură Git „neo”.
$ git branch neo
Vom trece la ramura „neo”.
$ git checkout neo
Switched to branch 'neo'
Pentru a reveni la ramura originală, vom folosi următoarea comandă:
$ git checkout -
Switched to branch 'main'We have learned about overriding the remote repository. Let’s learn how to override the local repository using the remote repository.
Vom folosi comanda `fetch` pentru a obține cele mai recente modificări din depozitul de la distanță.
$ git fetch origin
Then, we will use the ‘reset’ command with the ‘hard’ flag to override any local changes with the remote version. Please note that this will permanently discard any local changes.
$ git reset --hard origin/master
HEAD is now at f425059 Love
Dacă există încă fișiere neurmărite, acestea pot fi eliminate folosind următoarea comandă:
$ git clean -dfAm fost inspirat să scriu acest articol după ce am vizionat un Video de pe YouTube de Fireship. Îl admir pe creator pentru capacitatea sa de a explica subiecte complexe într-un mod simplu. Urmând metoda lui, am învățat multe despre caracteristicile Git.
În acest articol, am acoperit tehnici Git avansate, care sunt cruciale pentru oamenii de știință de date și inginerii de software care lucrează la un proiect de date în colaborare. Cunoașterea acestor tehnici vă poate ajuta să evitați accidentele și să rezolvați problemele mult mai rapid.
Sper că ați găsit acest blog util. Vă rugăm să-mi spuneți dacă doriți să citiți mai multe postări cu informații de dimensiunea octeților despre instrumentele utilizate în mod obișnuit în lumea științei datelor.
Abid Ali Awan (@ 1abidaliawan) este un profesionist certificat în domeniul științei datelor, căruia îi place să construiască modele de învățare automată. În prezent, se concentrează pe crearea de conținut și pe scrierea de bloguri tehnice despre învățarea automată și tehnologiile științei datelor. Abid deține o diplomă de master în managementul tehnologiei și o diplomă de licență în ingineria telecomunicațiilor. Viziunea lui este de a construi un produs AI folosind o rețea neuronală grafică pentru studenții care se luptă cu boli mintale.
- Distribuție de conținut bazat pe SEO și PR. Amplifică-te astăzi.
- PlatoData.Network Vertical Generative Ai. Împuterniciți-vă. Accesați Aici.
- PlatoAiStream. Web3 Intelligence. Cunoștințe amplificate. Accesați Aici.
- PlatoESG. carbon, CleanTech, Energie, Mediu inconjurator, Solar, Managementul deșeurilor. Accesați Aici.
- PlatoHealth. Biotehnologie și Inteligență pentru studii clinice. Accesați Aici.
- Sursa: https://www.kdnuggets.com/10-advanced-git-techniques?utm_source=rss&utm_medium=rss&utm_campaign=10-advanced-git-techniques
- :este
- :nu
- $UP
- 1
- 10
- 16
- 17
- 2024
- 22
- 58
- 7
- 8
- 9
- a
- capacitate
- Despre Noi
- despre
- absolut
- acces
- accidental
- accidente
- adăuga
- adăugat
- adăugare
- Suplimentar
- avansat
- După
- AI
- TOATE
- permite
- deja
- an
- și
- O alta
- Orice
- Aplică
- adecvat
- SUNT
- ZONĂ
- articol
- At
- evita
- înapoi
- Noțiuni de bază
- BE
- înainte
- Blog
- bloguri
- Branch firma
- ramuri
- browser-ul
- construi
- Clădire
- dar
- by
- CAN
- caz
- Certificate
- si-a schimbat hainele;
- Modificări
- Finalizeaza comanda
- curat
- Cloud
- cod
- colaborativ
- comite
- comite
- comise
- săvârșire
- în mod obișnuit
- Terminat
- complex
- prin urmare
- conţinut
- crearea de continut
- Corespunzător
- ar putea
- socoteală
- acoperit
- crea
- creează
- creaţie
- creator
- crucial
- Curent
- În prezent
- Liniuţă
- de date
- știința datelor
- om de știință de date
- Data
- abuzive
- Mod implicit
- Grad
- Deltă
- detaliat
- dificil
- direct
- Afişa
- do
- face
- face
- făcut
- cu ușurință
- eficient
- Inginerie
- inginerii
- Eter (ETH)
- excelent
- Explica
- mai repede
- Favorite
- Caracteristică
- DESCRIERE
- puțini
- Fișier
- Fişiere
- First
- steaguri
- concentrându-se
- a urmat
- următor
- Pentru
- Forţarea
- uitat
- formă
- găsit
- Gratuit
- din
- faţă
- obține
- merge
- GitHub
- Go
- grafic
- Rețeaua neuronală grafică
- HAD
- Greu
- Avea
- he
- cap
- ajutor
- lui
- istorie
- deține
- speranţă
- Cum
- Cum Pentru a
- Totuși
- HTTPS
- i
- ID
- idei
- if
- boală
- important
- in
- include
- Crește
- index
- informații
- inspirat
- in schimb
- ISN
- probleme de
- IT
- Jan
- doar
- KDnuggets
- A pastra
- Cheie
- Cunoaște
- Cunoaștere
- Ultimele
- AFLAȚI
- învățat
- învăţare
- mai putin cunoscut
- lăsa
- Nivel
- ca
- Probabil
- Linie
- Listă
- ll
- local
- log
- Uite
- arată ca
- Lot
- dragoste
- iubeste
- maşină
- masina de învățare
- făcut
- Principal
- mentine
- face
- administrare
- manager
- multe
- maestru
- me
- mental
- Boală mintală
- Îmbina
- mesaj
- mesaje
- metodă
- minte
- Modele
- mai mult
- mai eficient
- mult
- multiplu
- nume
- nume
- Navigaţi
- Nevoie
- NEO
- reţea
- neural
- rețele neuronale
- Nou
- nota
- acum
- obiecte
- ocazii
- of
- promoții
- on
- ONE
- afară
- Opțiune
- or
- Origine
- original
- al nostru
- afară
- producție
- trece peste
- primordial
- perioadă
- permanent
- Plato
- Informații despre date Platon
- PlatoData
- "vă rog"
- Post
- postări
- presa
- precedent
- Pro
- Produs
- productivitate
- profesional
- Progres
- proiect
- furnizarea
- trăgând
- Împinge
- împingerea
- Piton
- RE
- Citeste
- Citind
- recomandat
- redirecționa
- la distanta
- scoate
- îndepărtat
- depozit
- rezolvă
- rezolvarea
- restabili
- reține
- reveni
- reveni
- Alerga
- funcţionare
- s
- Economisiți
- salvate
- Ştiinţă
- Om de stiinta
- oamenii de stiinta
- câteva
- partajarea
- să
- simplu
- simplu
- pur şi simplu
- aptitudini
- So
- Software
- ceva
- spații
- înscenare
- ascunde
- Stat
- Încă
- Incercand
- Elevi
- sigur
- Intrerupator
- comutate
- T
- Tehnic
- tehnici de
- Tehnologii
- Tehnologia
- telecomunicaţie
- spune
- Terminal
- acea
- Noțiuni de bază
- Lor
- apoi
- Acolo.
- Acestea
- ei
- acest
- ori
- la
- astăzi
- Unelte
- subiecte
- Total
- ui
- utilizare
- utilizat
- util
- folosind
- verifica
- versiune
- Vizualizare
- viziune
- vrea
- a fost
- vizionarea
- Cale..
- we
- Ce
- cand
- oricând
- OMS
- voi
- cu
- fără
- mirare
- Apartamente
- de lucru
- lume
- ar
- scrie
- scris
- tu
- Ta
- youtube
- zephyrnet