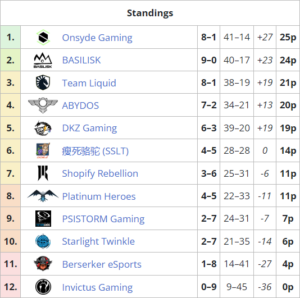
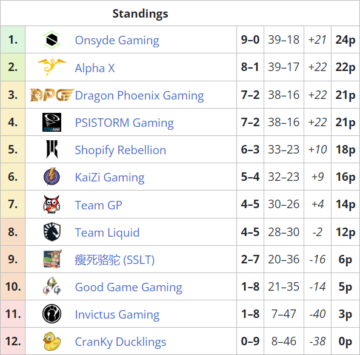
DPG's three-season reign at the top of the World Team League finally ended as ONSYDE Gaming emerged as champions of the 2023 Summer Season. Winning the regular season ensured ONSYDE a direct spot in the grand finals of the playoffs, where they ended up facing the dangerous newcomers in BASILISK.
While BASILISK's Serral showed his might in the semifinals with an all-kill against ABYDOS, ONSYDE Gaming had an ace up their sleeve in the form of Solar. He expertly exploited BASILISK's weakness in ZvZ, taking out both Serral and Reynor in the final two matches to clinch the championship for ONSYDE Gaming.
Solar may have been the hero of the grand finals, but ONSYDE's overall performance reflected their quality in the regular season. Far from being a team carried by ace player Maru, every player contributed evenly to help ONSYDE win the #1 seed. And, in the finals, every player came up with a vital contribution: Ryung took out Trigger without any complications, Maru got the 2-0 against Reynor, and Solar delivered the ZvZ wins his team desperately needed.
There’s no doubt BASILISK will come back with a vengeance next season, with an improved Trigger and the Zerg duo out for blood. But, for now, ONSYDE stands atop the World Team League mountain, ready to defend their title.
WTL will resume soon with its 2023 Winter Season, starting with the Code A phase of the tournament on September 11th.
Playoffs Recap
![[image loading]](https://platoaistream.com/wp-content/uploads/2023/09/onsyde-gaming-win-wtl-summer-2023.png) Round 1:
Round 1:Platinum Heroes 瘦死骆驼 (SSLT)
Watch VOD
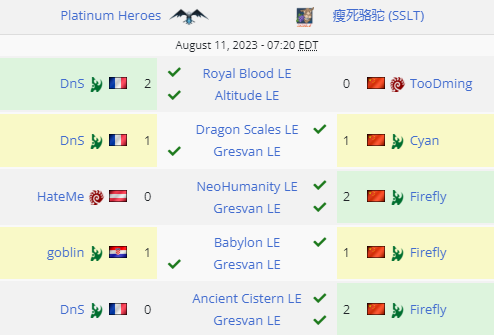
The 6th and 7th seeded teams started the playoffs with very long odds to reach the finals, but there was still plenty of pride at stake for the season's two biggest dark horses. Platinum Heroes had won their regular season clash while the Starving Camels had shown more upside, making this a very close match on paper. The official broadcast even needed to bring the WTL office cat to break a tie in caster predictions, tipping it 5-4 in favor of SSLT.
Match 1: DnS 2-0 TooDming: The two teams chose the opposite strategy to start things off, with the Heroes sending out their ace DnS while the Camels sent one of their support players in TooDming. DnS's three-Oracle opener didn't get off to the ideal start, but he eventually found his groove and got the Drone kills he needed. He built up a powerful army behind this, forcing TooDming to try to tech up to Brood Lords before it was too late. However, DnS comfortably hit his timing window, wiping out TooDming's mass Roach-Bane to draw first blood. DnS tried to keep his roll going in game 2 with DT's into double Archon-drop, but Toodming saw it coming and defended it very well before hitting a strong 68-Drone Roach-Ravager attack to punish a greedy fourth base from DnS. In a favorable position, TooDming made things complicated for himself by tech-switching to Mutalisks. This gave DnS an opportunity to gather an army and launch a potentially lethal attack, but TooDming managed to survive and pick off quite a few units as they retreated. It was seemingly a done deal after that, as TooDming went up by over 70 supply with his counterattack. However, TooDming again made things difficult for himself by trying to force an end to the game, throwing away heaps of units in a series of questionable attacks. Somehow, through a combination of TooDming's poor offensive execution and DnS's good defensive micro, the Heroes' ace was able to scrap together one last army and win with an all-in attack.
Match 2: DnS 1-1 Cyan: Cyan came out on fire, immediately getting a map off of DnS to knock him out. DnS lost track of Cyan's scouting Probe, which managed to sneak a Pylon in the corner of the main for some damaging Adept warp-ins. Cyan kept the backdoor attacks going into the mid-game with Oracles and DT's, and eventually DnS broke down and had to GG out. DnS went for a 1 base proxy-Immortal strategy in game 2, looking to take Cyan down with him. While DnS couldn't kill Cyan outright, he did set up a contain while expanding back at home. Cyan was able to break out once he had access to his Warp Prism, after which he went on the counterattack. It was a tight defense for DnS, but his decision to get a couple of Phoenixes made the difference as he defended the attack and took a huge lead. DnS then snowballed his resource advantage to a victory a few minutes later.
Match 3: Firefly 2-0 HateMe: In the pre-match interview, Platinum Heroes' manager Tassad had hinted that Firefly wouldn’t only have Protoss to worry about. While I expected that meant Vindicta, the heroes' threw threw a curveball at us by bringing out HateMe for only the second time this season. Sadly, it was probably a case of being too clever for your own good, as HateMe went for two aggressive openings that didn't work out. Firefly was never really bothered and took a convincing 2-0 victory, tying both teams with two lives remaining.
Match 4: Goblin 1-1 Firefly: The Heroes went to a more standard choice in Goblin for their third player, hoping the tricky Protoss could repeat his regular season performance and take out Firefly. The star sense of the Camels' ace tingled in game 1, leading him to scout his opponent's proxy-Stargate. Having just played HateMe, Firefly probably only had cheeses on his mind and was a bit thrown off with Goblin slapping down a quick expansion after being found out. But after scouting a DT follow-up from Goblin, Firefly easily identified he had a path to victory by turning his defensive setup into a two-base Immortal push which he executed to near perfection. In game 2, Firefly chose to roll the dice himself with a one-base, 3-gate Robo all-in. Goblin didn’t scout anything but still countered Firefly's build. He sacrificed his natural and defended from his main, while an Oracle went off and killed seven of Firefly's Probes. Goblin played his advantage expertly, busting out with Stalker-Void Ray and taking a considerably faster expansion than Firefly. He closed the game out very prudently, dragging the game for probably longer than it needed to be, but better safe than sorry when one faces SSLT's final boss.
Match 5: Firefly 2-0 DnS: Both sides decided it would be prudent not to get too cute with their revive choices, immediately sending out their aces (while this would prevent them from being revived for a potential ace match, what use is that if you don't even get there?).
Keeping with their reputations in high-profile games, Firefly went for an aggressive one-base Robo-Gateway build while DnS played a standard, safe two-base Robo strategy. Firefly used Adept drops and shades to soften DnS up slightly before committing to a frontal attack. One Immortal, a Prism, and a whole lot of Adepts had just enough firepower to overwhelm DnS's defenses and force the GG, putting Platinum Heroes up against the verge of defeat.
DnS pulled out a proxy-Robo Immortal push as a potential way out of his predicament, but the proxy Pylon was discovered almost immediately by Firefly's scouting Probe. Undeterred, DnS challenged Firefly to a micro-battle by continuing to build a Robo in plain sight. Firefly was not impressed, and proceeded to calmly defend the push off of two bases with Phoenixes to counter the Immortals. Stuck on one base and with no path to victory, DnS went for a final attack before GG'ing out.
Firefly proved to be the difference maker once again for the Starving Camels and he improved to a 20-10 record (playoffs + regular season) as he carried the team past the Platinum Heroes to a guaranteed 6th place finish.
Round 2:ABYDOS > [瘦死骆驼 (SSLT)
Watch VOD
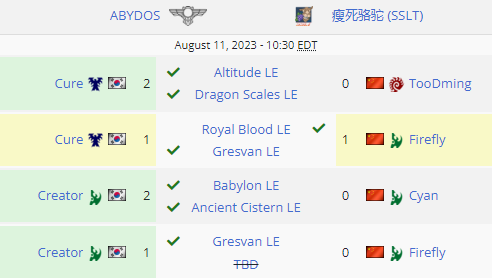
Match 1: Cure 2-0 TooDming: The Camels did not deviate from their previous winning gameplan, sending out TooDming first. Meanwhile, ABYDOS went full speed out of the gates with Cure. The Gamers8 runner-up went for a 2-Rax Reaper into 3CC opening in game 1, which TooDming answered with a quick Spire and Muta-Ling-Bane. While this allowed TooDming to stop the first double-Medivac push, Cure's macro was just too strong and he overwhelmed the Zerg with his second and third pushes. In game 2, Cure went back to 2-Barracks Reapers, but this time changed it up with a 4-Barracks Marine transition. Amusingly enough, this matched up quite favorably against TooDming's low-econ Ling-Bane bust, which had to use too many of its Banelings on buildings with barely any left to hit Marines. TooDming couldn’t deal any meaningful damage and Cure strolled to an economy-based victory.
Match 2: Cure 1-1 Firefly: Needing to stop Cure's momentum right away, the Camels had to send Firefly out against the best TvP player in the world. Firefly understood the assignment, going for a 4-Gate Blink-Stalker build in game 1. ‘’herO-like’’ would probably be a good way to describe what happened next, as Firefly made a series of aggressive moves that seemed disastrous at first but somehow worked out in the end. Eventually, Cure was all out of units and SCV's, and it looked like we might have a miracle on our hands. Cure stepped on such hopes in game 2, where he took the 1-1 tie in convincing fashion. He pounded Firefly with multi-prong attacks in the early/mid-game, turning the eventual Storm timing into an all-in attack. Despite some amazing Storms, Firefly couldn't do nearly enough damage to make up the difference and had to GG out.
Match 3: Creator 2-0 Cyan: Cure passed the baton on to Creator, and he was sure ready for it. It was two fairly straightforward PvP wins against Cyan. Creator took the first map by defending a two-base Immortal push, and then countering with a Stalker-Void Ray attack that allowed him to take a big lead. Game 2 was over as soon as Cyan decided to skip a Shield Battery in his main, losing 20 Probes to Oracles by the 5-minute mark.
Match 4: Creator 1-0 Firefly: The Camels' only hope was Firefly going on a crazy hot streak to force an ace match (technically, he could have won it for the Camels outright by going 6-0 from this point). Unfortunately, he couldn't keep his run of incendiary play going any longer. Playing a Blink-Stalker opener off of two bases, Firefly jumped immediately into Creator's main with his first Blink. However, Creator was well-prepared on defense, and made Firefly pay a heavy price in Stalkers for his aggressive move. Further Blink tactics didn't help Firefly's situation, and Creator's lead only grew as time went on. Firefly tried a few more ploys after that including a semi base-trade, but Creator kept everything simple to calmly eliminate the Starving Camels.
Round 3:Team Liquid ABYDOS
Watch VOD
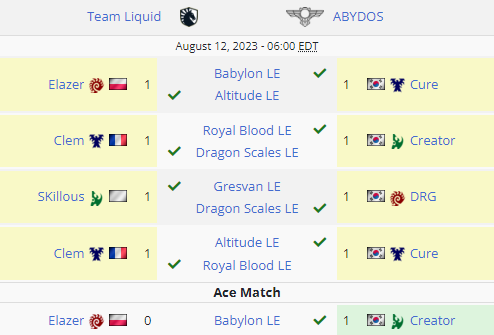
Match 1: Elazer 1-1 Cure: Team Liquid predicted Cure would be the point man again and sent out Elazer to snipe him in a relatively favorable match-up (that, or they just lucked out). Elazer came close to getting the upset on Babylon, rattling Cure with Ling runbys and backstabs. However, Cure's Tank count got too large for Elazer's pure Ling-Bane to handle, and he had to GG out against a powerful Bio-Tank push. Elazer turned to Altitude for game 2, a map that allows for lots of movement and sneaky Ling-Bane attacks. Indeed, the Liquid Zerg brought the chaos quickly, matching Cure's Medivac-drop harass with aggressive Ling-Bane counterattacks of his own. The overall balance sheet came out favoring Elazer, and Cure was the one who had to slow things down and try to stabilize. However, Elazer didn't let up the pressure, continuing to pound Cure with Hydra-Ling-Bane. The trades were not exactly great for Elazer, but it didn't really matter as he had enough of a resource advantage to beat Cure into submission.
Match 2: Clem 1-1 Creator: The boys in blue once again got a potentially favorable draw in Clem versus Creator. However, Creator was more than ready for the duel. After getting scouted in game 1, he faked a 4-Gate Blink only to cancel into a greedier 3-base Storm build. Once Clem realized he had been fooled, he tried to leverage his army investment into a two-base Bio-Tank-Raven push. But by the time he reached the Protoss side of the map, Creator already had four Storms and a bunch of Immortals ready. Creator smashed the attack and landed a counter-punch to take down the Liquid ace. Creator probably smelled a 2-0 after scouting Clem's proxy-Starport and killing the building SCV in game 2. He chose to go for a one-base attack as a follow-up, and damn near got the knockout blow. However, missed focus fire allowed Clem to keep his main ramp wall intact with mass repair, allowing him to cheat what looked like certain death. Creator came out of the exchange with a small army advantage but a huge economic deficit, and that stayed the case for the rest of the game. Creator got some decent fights with Chargelot-Phoenix, but was eventually overrun by higher quality bio forces.
Match 3: SKillous 1-1 DongRaeGu: With SKillous being the sure choice for Liquid, ABYDOS went for the slightly surprising pick of DRG as their next player. DRG's ZvP had been a liability in the past, which might have made NightMare an appealing option considering his 2-0 over SKillous during the regular season.
Game 1 made it look like a tactical error for ABYDOS, as DRG lost a particularly on-brand ZvP. He got into a great position with Zergling runbys and Roach-Ravager-Lurker pushes, but just didn't know how to navigate late-game ZvP. SKillous saved enough of his core infrastructure to get a couple of Carriers, which coupled with a bazillion Archons, were enough to burn through DongRaeGu's forces for the comeback win. Thankfully for ABYDOS, DRG managed to salvage a map in game 2. He built a quick Spire and struck with Mutalisks while most of SKillous' units were in transit, killing 23 Probes. DRG tried to use this momentum to steamroll SKillous with waves of Ling-Bane-Roach-Muta, but TL's youngest player proved to be a tough nut to crack. He continued to hold out, slowly assembling another deadly army. Skillous chose a good moment to strike back, abandoning his bases for an all-nothing-attack just as DRG started going up to Hive. When a bunch of Stalkers, Disruptors, and Archons were ransacking DRG's third, it felt like he had truly fumbled the game. In the end, however, DongRaeGu was able to crank out just enough Zergling reinforcements to hold and tie the series, probably very happy he didn’t have to play another game against SKillous.
Match 4: Clem 1-1 Cure: Both teams' aces, Clem and Cure, were revived to try and get the series-clinching 2-0 for their teams. Kicking things off on the snowy battlefield of Altitude, Clem dominated the conventional portion of the game. He defended Cure's 3-base push with aplomb, while his counterattack managed to deal serious damage to Cure's economy. Playing from behind, Cure tried to use constant drops and backdoor tactics to disorient Clem, but it didn't seem to be slowing his slow snowball to victory. However, Cure's commitment to chaos eventually paid off, as he caught Clem making a mistake. Clem's main Tank force got caught without enough Marine support, allowing Cure to pounce and gun them down with Marines. Cure continued to play a high tempo game from this point, bullying Clem around the map while transitioning to Liberators first. Clem looked visibly frustrated as the airborne besiegers checkmated him, forcing him to give up match point. Both players had similar ideas in game 2, with Clem going 2-Rax Reaper expand against Cure's 3-Rax Reapers. Despite losing his first Reaper across the map, Clem was able to stall Cure's aggression with great micro until he got his first two Hellions. With Clem having an expansion while Cure was all-in on one base, it was simple enough for the Liquid ace to close things out and force a final ace match.
Ace Match: Creator 1-0 Elazer: For the first time since 2020, we saw a WTL playoff series go to an ace match after four 1-1 ties. With the rules only allowing a player to be revived once per series, that meant neither Clem nor Cure could be 'ace-revived' for this final showdown. Both teams opted to go with the safe option of ace-reviving their obvious #2 players, with ABYDOS sending out Creator while Liquid leaned on Elazer.
Creator had something a bit peculiar planned for the occasion, going for a double-Archon drop off a Templar Archives, not a Dark Shrine. Ultimately, it was just a small quirk as we ended up headed into a very typical mid-game where Creator tried to defend his four-base setup against waves of mass Roach-Ravager-Baneling from Elazer. With good control, and very good splits and Stasis Wards, Creator was able to absorb Elazer's aggression and launch one huge counterattack to secure victory and advancement for ABYDOS.
ABYDOS would only get a brief respite after winning such a nail-biting victory, as they would have to face Dragon KaiZi Gaming on the same day…
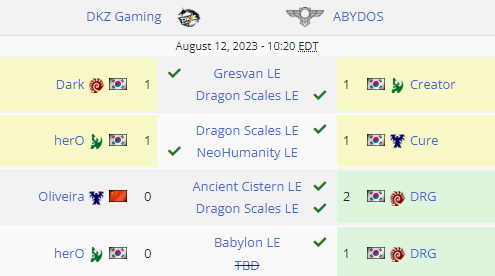
Round 4:Dragon KaiZi Gaming ABYDOS
Watch VOD
Several years of WTL history were represented in this single match, with Dragon KaiZi Gaming continuing the legacies of DPG and KaiZi Gaming while ABYDOS carried on a portion of Team NV's spirit. Those three teams had become the elite of the WTL when Jin Air disbanded in 2019, winning all six championships afterward.
The fact that these two teams were meeting as early as the Round 4 demonstrated exactly how much the WTL landscape over the last year, with newcomers ONSYDE and BASILISK signing away top talent as well as bringing in stars of their own.
Match 1: Dark 1-1 Creator: DKZ got off to a strong start as Dark bullied Creator like it was still 2019 in game 1. Dark was the only one who got to have any fun in the game, with his 40+ Mutalisks haranguing Creator into a GG. However, 2023 Creator showed up in game 2 to take the tying point. Choosing Dragon Scales, Creator went for a 4-Gate Glaive-Adept attack. Dark appeared to have all he needed for the initial defense, but made the rather Dark-esque move of sending speedlings to counterattack instead of defend. This decision didn't quite work out for Dark, with Creator cutting him down to 30 Drones while staying in a decent position himself. Dark stayed true to his aggressive nature, going all-in with Roach-Ravager-Ling off of his weak economy. He almost broke through the Protoss defenses, but Creator had sniffed out Dark's plan and prepared Dark Templars in time to nullify the attack. That put Creator into a near-unlosable position, which he converted into a win.
Match 2: herO 1-1 Cure: Both teams continued to send out the big guns with Cure taking the field for ABYDOS while herO stepped up for DKZ. Game 1 went to Cure in a great display of control and patience. Starting from a Tank-Raven push off of two bases, Cure sized up herO's strong defense and shrewdly decided to play things out methodically. He used his frontal push as an anchor for punishing drop maneuvers, all while expanding to his third base and taking a macro lead. herO couldn't get out of Cure's slowly tightening vice and was eventually forced to surrender. herO wouldn't go down without a fight, however, and got a comprehensive win of his own in game 2. He unleashed a vicious counter to Cure 3-rax opening on NeoHumanity, going for a 4-Gate Blink-Stalker into Colossus timing that completely ran Cure over.
Match 3: DongRaeGu 2-0 Oliveira: For the second series in a row, ABYDOS opted to skip over NightMare and instead turn to DRG as their third player. This time, however, it made a lot more sense as they got to unleash his potent ZvT against Oliveira.
The 2023 World Champion opened game 1 with a sneaky 2-Factory blue-flame Hellion build, only to be met by a near-perfect defense from DRG that resulted in zero Drone kills. Despite this terrible start, Oliveira did manage to sell DRG on the idea that he was going mech when he was actually going bio. This resulted in DRG's Baneling speed being very late against Oliveira's 'surprise' bio, which managed to take down the Zerg fourth and somewhat even up the game. However, being even against DRG's Muta-Ling-Bane is not a situation any Terran wants to be in, and the ABYDOS Zerg was in perfect control once he got a handle on the situation. He got the better of Oliveira in nearly every fight and eventually overwhelmed him to take the map. Oliveira played a much more common 2-Rax Reaper opening in game 2, transitioning into Hellion-Liberator harassment paired with a double drop of Marines. He managed to snag around 15 Drones and looked to be in great position until a well-timed Zergling runby blitzed past a lowered depot at his natural. The Zerglings wreaked havoc in the main, giving DRG plenty of time to recover and set up mass Ling-Bane production. Like in game 1, DRG was just the stronger player once the macro part of the game started, and he overpowered Oliveira once more to put ABYDOS on match point.
Match 4: DongRaeGu 1-0 herO: DKZ chose to put their fate in the hands of herO, valuing the immediate impact of his PvZ over the potential hazard of facing Cure down the line. However, things didn't go at all as planned, as an on-fire DRG took out herO and put the reigning WTL champions in the dirt.
herO went for heavy Oracle-Adept pressure early on, but DRG defended solidly while using a Zergling counterattack to chip into herO's economy. herO's follow-up Blink Stalker harassment failed to make an impact either, and he soon found himself facing down huge waves of Roach-Ling-Bane with a threadbare defense. His only hope was to make a couple of decisive holds and stabilize, but DRG wouldn't give him the chance. Each wave of Zerg attacks put herO in a worse position, and soon it became clear that the game was a lost cause. After a final, desperation attack, herO conceded his team's defeat. The three season reign of DPG/DKZ came to an end, while ABYDOS advanced to championship Sunday.
Round 5:BASILISK > ABYDOS
Watch VOD
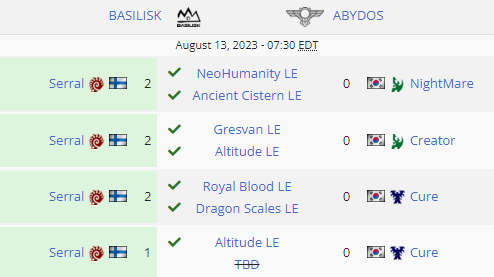
Match 1: Serral 2-0 NightMare: Having been benched in the previous two matches, NightMare finally got his chance to play… …against Serral's terrifying ZvP. Now, while we know that Serral was about to 7-0 ABYDOS into oblivion in one of the most impressive displays the WTL had ever seen, we should give credit to NightMare for briefly making it look like he had a chance in game 1.
NightMare got off to a terrible start, as his attempt to go through the backdoor mineral wall on NeoHumanity with a Glaive-Adept cheese was scouted and shut down. Things got even worse from there, as his follow-up DT's were denied as well. From there, all NightMare could do was try for a Hail Mary all-in of 3-base Blink Stalkers… …and someone in the heavens seemed to listen. For the next three minutes, NightMare pulled off some of the best Blink-Stalker micro I’ve seen in a very long time, chipping away at Roaches and Lings to turn a 20 army-supply difference into a tie. And, then, just as he was snowballing his way into a lead, NightMare Blinked all his Stalkers right on top of 20 Lings. GG. As it turned out, it wasn't the holy lady who heard his prayer, but the infinitely cruel gods of StarCraft. Did NightMare replicate this exploit in game 2? No, he didn’t. Serral ran a thousand Lings into his bases and destroyed him.
Match 2: Serral 2-0 Creator: ABYDOS tried to counter Serral with another Protoss in Creator, but there was no change in the result. Game 1 was a pretty straight-forward macro beatdown, with Serral's Ravager-Ling-Bane plowing through Creator's defenses. Then, in game 2, Serral managed to sneak a Spire outside the gaze of Creator, catching him off guard with a Mutalisk strike. The small squad of Mutalisks severely disoriented Creator, creating an opening for Serral to win with a frontal attack of Roach-Ravager.
Match 3: Serral 2-0 Cure: Ace player Cure was summoned to try and turn the series around, but it was to no avail against the Finnish Phenom. Serral took firm control of game one with a Roach-Ravager style, pinning Cure in a corner while he gobbled up the rest of the map. By the time Cure had stabilized and could move out, Serral was ready with Hive tech and smashed Cure in the deciding battle. Game two followed a similar pattern, only with Serral using Ling-Bane to control and contain Cure. However, this time, Cure managed to put together a much more dangerous max-supply push, which looked like it might actually win in a head on battle. However, Serral utilized his economic advantage beautifully, using backdoor attacks and small skirmishes to chip away at Cure's army and force the GG.
Match 4: Serral 1-0 Cure: Cure was revived to take one last shot at Serral, and he gambled early with a proxy 3-Barracks rush on Altitude. Serral managed to hold off the cheese, but Cure kept the Zerg economy weak enough that the situation ultimately ended up being fairly even for both players. After both players took a few minutes to build up, Cure resumed the action with a hyper-mobile Marine-Medivac-Marauder-Mine style. Serral's defense was on point, and he deflected all of Cure's prods and pokes as he covered his half of the map in Creep. Still, Cure kept himself in a good position as well by building a strong economy back at home.
The game turned on one key battle near the few remaining expansions on the map. Serral, having built up a considerable bank, got a favorable engagement against the Terran bio and took a sizable supply lead. Cure probably didn't realize how fast things would snowball from there, as Serral immediately replenished his army and launched another attack. This second attack broke the core of Cure's force (thanks to a nice burrow-Fungal against his Ghosts), depleted his bank, and left him desperately scrambling to stabilize. Serral refused to take his foot off the gas and continued to send waves of Zerg at Cure until he had to admit defeat.
Serral's victory gave BASILISK the first ever 7-0 all-kill in the WTL era, with Dream having last achieved such a result in 2020 when the tournament was known as the Gold Series Team Championship. Individually, Serral improved to an unbelievable 30-1 in the regular season and playoffs combined, easily the best performance in WTL history up to that point. The only thing left was to complete the Royal Road run against ONSYDE Gaming.
Grand FinalONSYDE Gaming > BASILISK
Watch VOD
This finals match-up seemed destined from the start. BASILISK and ONSYDE Gaming had been the consensus top two teams at the start of the season, and they lived up to expectations by finishing the regular season at the top of the table.
The two teams were very much alike in some ways, formed well into StarCraft II's 10+ year history and being fronted by iconic casters from their respective teams. Yet, their rosters couldn't have been any more different. BASILISK brought the two greatest European players in history, with a rising Canadian Protoss as their understudy. However, Reynor was the only one with any meaningful teamleague experience, while Serral and Trigger were in the midst of their first serious campaign.
Meanwhile, ONSYDE Gaming brought a highly seasoned squad of teamleague veterans. Maru had already won just about every major team competition in SC2, including Proleague, GSTL and previous iterations of the WTL. Solar was a foundational member of the SCBOY Team Leagues, winning the very first season back in 2019 as a member of TSG. Ryung, also a veteran of many team tournaments, had somehow enjoyed his best season at the age of 32.
Who would win this fateful clash?
Match 1: Ryung 2-0 Trigger: Having scored a near-upset against Maru in the regular season, Trigger looked to get an actual win against Maru's friend Ryung to open the series. However, it was Ryung who took the initial advantage on Gresvan, with his Mine-drop opener taking out 9 Probes. Trigger tried to keep playing a defensive Colossus-Stalker style from there, while Ryung prepared a quick attack with two Tanks and a Raven. This push was stopped at significant cost from Trigger, while Ryung built upon his lead and prepared for his follow-up attack. Ryung's next force, which had Viking and Ghost support, annihilated the Protoss defenders and gave Ryung a picture-perfect victory.
Ryung got off to another good start in game two, hitting with a Mine drop and following up with a surprisingly damaging Reaper-Hellion drop. This time however, Trigger prevented Ryung from compounding his lead, shutting down the follow-up 2-Medivac drop with Stalkers and a well-placed Observer. This equalized the game, and allowed Trigger to comfortably move into ground-heavy play off of four bases—an area he had looked very strong in. However, Ryung was just as good playing against Trigger's composition, expertly playing footsies against Purification Novas. When Ryung caught Trigger overextending and wasting Novas, he immediately charged at the Protoss force and left it in tatters. Ryung rapidly consolidated his lead, razing Nexuses and landing a huge drop into the Protoss main. All Trigger could do was launch a doomed frontal counterattack before GG'ing out.
Match 2: Reynor 2-0 Ryung: Though Ryung had upset Reynor with 1-1 tie in the regular season, BASILISK still decided sending out the Gamers8 champion was the most prudent move at this point in the match.
Ryung tried one of INnoVation's old favorites in game one, going for a mid-game 'all-in' off of three bases with eight Barracks constantly pumping out infantry. Ryung's first big attack took a decent trade against Reynor's Roach-Ravager-Bane, but Reynor's 90-Drone economy allowed a stream of reinforcements to stymie the attack. Ryung put up a surprisingly good fight after that, but the game had effectively ended when his 3-Base attack failed to punish the greedy Reynor. Eventually, the sheer force of numbers was too much for Ryung to overcome and he had to surrender.
Surprisingly, Ryung did not pick NeoHumanity as the next map, despite having exploited the map's terrain to upset Reynor in a late-game slog during the regular season. He did, however, bring a similar game plan to Gresvan, where he hoped to cut the map in half with mech. Unfortunately for Ryung, Reynor did not give him a chance to solidify his defenses, hitting the Terran forth base with mass Roach-Ravager-Bane as soon as it came online. This attack destroyed the Planetary as well as 30 SCV's, putting Ryung well behind. It is a well-known truism of SC2 that mech has a very hard time recovering from early-game damage, and it's certainly the case when one is playing someone of Reynor caliber. Reynor continued to pummel Ryung with attacks, and by the time Ryung finally stabilized, Zerg already had control of half the map. A wasteful Baneling attack into Thors gave Ryung a brief window to counterattack, but his economy was too damaged to capitalize. Reynor stalled at the front while launching constant backdoor attacks, leading to an inevitable GG from the depleted Ryung.
Match 3: Maru 2-0 Reynor: With two strong options on hand, ONSYDE chose to send Maru out to take down Reynor. Going for the popular 2-Rax Reaper opener in game 1, Maru got off to a nice start by taking down 6 Drones against Reynor's greedy gas-less build. However, the early-game wasn't all that bad for Reynor, as he completely shut down Maru's follow-up 4-Mine drop without a single Drone loss. This put Reynor in good position to go up to Muta-Ling-Bane, while Maru prepared for a big 3-Base Marine-Tank push through the center of the map. Reynor tried to deal with Terran push with his trademark backstab attacks, but his control was bizarrely off in this particular game. His Mutalisks and Zerglings got shredded due to his inattentiveness, leaving him with nothing to delay the deadly Terran push at the front. In a surprisingly easy victory, Maru's forces marched forward to collect the GG.
The series moved on to Ancient Cistern for game two, and Maru changed strategies up into a 2-base Marine-Tank all-in. His initial double-Medivac drop found a blind spot in the Zerg main and killed Reynor's Spawning Pool, starting a chain of neverending pressure that Reynor struggled to keep up with. Maru didn't actually commit to a direct frontal attack for a while, instead sieging his Tanks on the low ground outside of Reynor's main. Reynor defended admirably given the situation, splitting his troops expertly between defense and backdoor attacks. However, Reynor wasn't perfect in this department, and Maru nudged him closer to defeat when he launched a devastating Marine raid on the under-defended main. Maru started to push at the front after this, forcing Reynor to go for broke with a massive backdoor attack. While this did cripple Maru's economy, Reynor didn't have enough left in the tank to deal with Maru's final army and had to GG again.
Match 4: Serral 2-0 Maru: BASILISK was probably the only team in the world that could still feel okay being down 1-2 against ONSYDE, with Serral coming out to continue his rather one-sided 'rivalry' with Maru.
Maru went back to 2-Rax Reapers in game one, following up with Marine-Hellion harassment that got in a decent bit of pressure. However, Serral wouldn't be Serral if some light pressure fazed him, and he still got into a strong four base situation without much trouble. From there, Maru couldn't shake Serral at all with further Marine-Medivac attacks, and he had to make his late game transition by adding Ghosts and Liberators to his force. For a while, it seemed like Maru was in a solid position and on his way to establishing his beloved half-map split, but Serral found a chance to abruptly end the game. Maru positioned his main Bio-Ghost force a little too aggressively without enough support, and Serral seized the opportunity to pounce with his Hydra-Bane swarm. Just like Serral's prior win against Cure, the situation spiralled out of control for Maru after the backbone of his army was broken, and Zerg units continued to flood in to secure the victory.
Maru went for a 3-Base, 8-Barracks all-in in game 2, looking to succeed where Ryung had fallen short. However, Serral's Roach-Hydra into fast Hive allowed him to have Lurkers in time to defend the big push. Maru tried to spread his infantry out and attack the Lurkers head on, but it turned into a total Terran massacre against the entrenched Zerg units. All-in on three bases, Maru had no choice but to keep attacking and hope that Serral would slip up. However, it was to no avail, and Serral took the game with his impenetrable defense. .
Match 5: Solar 2-0 Serral: Altitude was the first battleground of this Gamers8 rematch, and the two Zergs went for mirroring macro builds in the early game. The first deviation came as Solar made a big round of Lings for some pressure whereas Serral went for a faster Roach Warren. The strategies continued to diverge, with Solar going up into Mutalisks while Serral countered with a Roach-Hydra composition. Serral's first big attack managed to inflict moderate economic damage, but it wasn't enough to destabilize Solar or prevent his Mutalisks flock from growing. Knowing that his path to victory was by snowballing his Mutalisks flock, Solar continued to reset Serral's Hydra count with Muta-Ling-Bane in a number of good trades. Eventually, Solar found the perfect kill-timing just before Serral's fungal was ready, and his Muta-Bane handed Serral his shock second loss of the season. In a throwback to IEM Katowice 2023, Serral's GG-timing here seemed somewhat early, but we'll defer to his judgment.
The two players headed to Gresvan for game 2, where both players started with conventional 3-Base Roach openers. Solar opted to get a faster Lair for a big Speed-Roach timing off of 52-Drones, while Serral got a later Lair and eventually a Spire. Serral seemed to make the huge misread of thinking Solar was going into Mutalisks again, overdroning heavily and actually starting up Spore Colonies in his bases. Solar's mass +1 Speed-Roaches caught Serral completely off guard, forcing the GG and bringing his near-perfect season to an anticlimactic end. In doing so, Solar also became only the fourth player since 2018 to win five maps in a row against Serral (the others being Clem, Dark, and DRG(!)).
Match 6: Solar 1-0 Reynor: Solar having a 5-0 record against Serral in August might have had a huge psychological effect against BASILISK. Having to revive a player, BASILISK opted NOT to go with their 90%+ win-rate ace. Instead, they put their faith in Reynor. The Italian prodigy had been in a similar scenario four months earlier, when KaiZi Gaming chose him over Oliveira as their last hope in the WTL Winter finals. KaiZi's bet didn't pay off in the end, but BASILISK must have hoped things would be different this time around.
Solar didn't give Reynor any time to ease into the match, going for a 28-Drone Roach-Bane attack. Reynor had a decent defensive setup with both a Baneling Nest and Roach Warren, and a furious, 2-minute battle ensued to decide BASILISK's fate. Reynor's defensive micro was good enough to save him from a direct defeat, but he was forced to sacrifice his third base and retreat to his natural ramp. On the other hand, Solar had taken his own third and was Droning up, putting him in a commanding position.
Solar's economic advantage allowed him to get both Roaches AND Mutalisks while Reynor was stuck playing solely on the ground. He only made a handful of Mutalisks to maintain map control, all the while building up a huge ground army based on his stronger economy. Once Solar gathered a sufficient force, he jumped on Reynor's outmatched army to force the final GG of the WTL Summer season.
- SEO Powered Content & PR Distribution. Get Amplified Today.
- PlatoData.Network Vertical Generative Ai. Empower Yourself. Access Here.
- PlatoAiStream. Web3 Intelligence. Knowledge Amplified. Access Here.
- PlatoESG. Automotive / EVs, Carbon, CleanTech, Energy, Environment, Solar, Waste Management. Access Here.
- PlatoHealth. Biotech and Clinical Trials Intelligence. Access Here.
- ChartPrime. Elevate your Trading Game with ChartPrime. Access Here.
- BlockOffsets. Modernizing Environmental Offset Ownership. Access Here.
- Source: https://tl.net/forum/starcraft-2/615914-onsyde-gaming-win-wtl-summer-2023
- :has
- :is
- :not
- :where
- $UP
- 1
- 15%
- 20
- 2018
- 2019
- 2020
- 2023
- 23
- 30
- 32
- 6th
- 70
- 7th
- 9
- a
- Able
- About
- abruptly
- access
- achieved
- across
- Action
- actual
- actually
- adding
- adept
- admit
- advanced
- advancement
- ADvantage
- After
- again
- against
- age
- aggressive
- AIR
- alike
- All
- allowed
- Allowing
- allows
- almost
- already
- also
- amazing
- an
- Anchor
- Ancient
- and
- Another
- any
- anything
- appealing
- appeared
- archives
- AREA
- Army
- around
- AS
- At
- attack
- Attacking
- Attacks
- AUGUST
- away
- babylon
- back
- Backbone
- backdoor
- Bad
- Balance
- Balance Sheet
- Bank
- base
- based
- battery
- Battle
- Battlefield
- battleground
- BE
- beautifully
- became
- become
- been
- before
- behind
- being
- beloved
- BEST
- Bet
- Better
- between
- Big
- Biggest
- Bit
- blind
- Blink
- blood
- blow
- Blue
- BOSS
- both
- Both Sides
- Break
- break out
- briefly
- bring
- Bringing
- broadcast
- Broke
- Broken
- brought
- build
- Building
- builds
- built
- bullying
- Bunch
- burn
- bust
- but
- by
- came
- Campaign
- Canadian
- capitalize
- carried
- carriers
- case
- CAT
- caught
- Cause
- Center
- certain
- certainly
- chain
- challenged
- champion
- Champions
- championship
- Chance
- change
- changed
- Chaos
- charged
- chip
- choice
- choices
- choosing
- chose
- Clash
- clear
- Close
- closed
- closer
- collect
- combination
- combined
- come
- Comeback
- coming
- commit
- commitment
- committing
- Common
- competition
- complete
- completely
- complicated
- composition
- comprehensive
- Consensus
- considerable
- considering
- constant
- constantly
- contain
- continue
- continued
- continuing
- contributed
- contribution
- control
- conventional
- converted
- Core
- Corner
- Cost
- could
- couldn
- Counter
- Couple
- coupled
- covered
- crack
- crazy
- Creating
- creator
- credit
- cure
- Cut
- cutting
- cyan
- damage
- damaging
- Dangerous
- Dark
- deal
- Death
- decent
- decide
- decided
- Deciding
- decision
- decisive
- Defenders
- Defending
- Defense
- defensive
- DEFICIT
- delay
- delivered
- demonstrated
- Department
- describe
- desperately
- desperation
- Despite
- destined
- destroyed
- devastating
- deviation
- DID
- didn
- difference
- different
- difficult
- direct
- dirt
- disastrous
- discovered
- Display
- displays
- Disruptors
- Diverge
- dns
- do
- doing
- don
- done
- Doomed
- double
- doubt
- down
- Dragon
- draw
- dream
- drone
- Drones
- Drop
- Drops
- due
- DUEL
- during
- each
- Earlier
- Early
- ease
- easily
- easy
- Economic
- economic damage
- economy
- effect
- effectively
- either
- eliminate
- elite
- emerged
- end
- ended
- engagement
- enough
- ensured
- entrenched
- Era
- error
- establishing
- Ether (ETH)
- European
- Even
- evenly
- eventual
- eventually
- EVER
- Every
- everything
- exactly
- exchange
- executed
- execution
- Expand
- expanding
- expansion
- expectations
- expected
- experience
- expertly
- Exploit
- exploited
- Face
- faces
- facing
- fact
- Failed
- fairly
- faith
- Fallen
- far
- Fashion
- FAST
- faster
- fate
- favor
- favorable
- Favorites
- feel
- few
- field
- fight
- fights
- final
- Finally
- finish
- finnish
- Fire
- Firm
- First
- first time
- five
- flood
- Focus
- followed
- following
- Foot
- For
- Force
- Forces
- form
- formed
- forth
- Forward
- found
- four
- Fourth
- friend
- from
- front
- Fronted
- frustrated
- full
- fun
- further
- game
- Games
- gaming
- GAS
- Gates
- gather
- gathered
- get
- getting
- Ghost
- Give
- given
- Giving
- Go
- GODS
- going
- Gold
- good
- grand
- grand finals
- great
- greatest
- Greedy
- grew
- Ground
- Growing
- guaranteed
- Guard
- GUNS
- had
- Half
- hand
- handful
- handle
- Hands
- happened
- happy
- harassment
- Hard
- Have
- having
- he
- head
- headed
- heard
- heavily
- heavy
- help
- here
- Hero
- Heroes
- High
- high-profile
- higher
- highly
- him
- his
- history
- Hit
- hitting
- Hive
- hold
- holds
- Home
- hope
- hopes
- hoping
- HOT
- How
- How To
- However
- HTTPS
- huge
- i
- iconic
- idea
- ideal
- ideas
- identified
- IEM
- if
- ii
- image
- immediate
- immediately
- Immortals
- Impact
- impressed
- impressive
- improved
- in
- Including
- Individually
- inevitable
- inflict
- Infrastructure
- ING
- initial
- Innovation
- instead
- Interview
- into
- investment
- IT
- Italian
- iterations
- ITS
- just
- Keep
- kept
- Key
- Kill
- Kills
- Know
- Knowing
- known
- lady
- landing
- landscape
- large
- Last
- Last Year
- Late
- later
- launch
- launched
- launching
- lead
- leading
- League
- leagues
- leaving
- left
- let
- Leverage
- liability
- light
- like
- Line
- Liquid
- little
- Lives
- ll
- Long
- long time
- longer
- Look
- look like
- looked
- looking
- Lords
- losing
- loss
- lost
- Lot
- Low
- lowered
- Macro
- made
- Main
- maintain
- major
- make
- maker
- Making
- man
- manage
- managed
- manager
- many
- map
- Maps
- Marine
- mark
- Mass
- massive
- Match
- matched
- matching
- Matter
- May..
- meaningful
- meant
- Meanwhile
- meeting
- member
- met
- micro
- might
- mind
- mineral
- minutes
- mirroring
- missed
- mistake
- moderate
- moment
- Momentum
- months
- more
- most
- Mountain
- move
- moved
- movement
- moves
- much
- multi-prong
- must
- Natural
- Nature
- Navigate
- Near
- nearly
- needed
- needing
- Neither
- Nest
- never
- newcomers
- next
- nice
- no
- nor
- nothing
- now
- number
- numbers
- NV
- obvious
- occasion
- Odds
- of
- off
- offensive
- Office
- official
- Okay
- Old
- on
- once
- ONE
- online
- only
- open
- opened
- opening
- openings
- Opportunity
- opposite
- Option
- Options
- or
- oracle
- Oracles
- Other
- Others
- our
- out
- outside
- over
- overall
- Overcome
- overwhelmed
- own
- paid
- paired
- Paper
- part
- particular
- particularly
- passed
- past
- path
- Patience
- Pattern
- Pay
- peculiar
- per
- perfect
- perfection
- performance
- pick
- Place
- Plain
- plan
- planned
- platinum
- plato
- Plato Data Intelligence
- PlatoData
- Play
- played
- player
- players
- playing
- Playoffs
- Plenty
- Point
- pool
- poor
- Popular
- position
- positioned
- potential
- potentially
- pound
- powerful
- predicted
- Predictions
- prepared
- pressure
- pretty
- prevent
- previous
- price
- pride
- Prior
- probably
- probe
- Production
- proved
- proxy
- pumping
- Push
- pushes
- put
- Putting
- quality
- Quick
- quickly
- raid
- Ramp
- rapidly
- rather
- RAY
- reach
- reached
- ready
- realize
- realized
- really
- record
- Recover
- recovering
- reflected
- regular
- relatively
- remaining
- repair
- repeat
- represented
- resource
- respective
- REST
- result
- resulted
- resume
- Retreat
- Revive
- right
- rising
- rivalry
- road
- robo
- Roll
- round
- ROW
- royal
- rules
- Run
- rush
- s
- sacrifice
- safe
- same
- Save
- saw
- scales
- scenario
- Scout
- Season
- seasoned
- Second
- secure
- seed
- seem
- seemed
- seen
- seized
- sell
- Semi
- send
- sending
- sense
- sent
- September
- Series
- serious
- set
- setup
- seven
- severely
- sheet
- Shield
- Short
- shot
- should
- Showdown
- showed
- shown
- Shut down
- side
- Sides
- Sight
- significant
- signing
- similar
- Simple
- since
- single
- situation
- SIX
- sizable
- sized
- slow
- Slowing
- Slowly
- small
- sneak
- Sneaky
- So
- solar
- solely
- solid
- solidify
- some
- Someone
- something
- somewhat
- Soon
- speed
- spirit
- split
- Splits
- Spot
- spread
- stabilize
- stake
- standard
- stands
- Star
- Starcraft
- Stars
- start
- started
- Starting
- stayed
- Still
- Stop
- stopped
- Storm
- storms
- straightforward
- strategies
- Strategy
- stream
- strike
- strong
- stronger
- style
- submission
- succeed
- such
- sufficient
- summer
- sunday
- supply
- support
- sure
- surprise
- surprising
- survive
- Swarm
- T
- table
- tactical
- tactics
- Take
- taken
- taking
- Talent
- tank
- Tanks
- team
- Team Liquid
- teams
- tech
- technically
- Tempo
- than
- thanks
- that
- The
- the world
- their
- Them
- then
- There.
- These
- they
- thing
- things
- Thinking
- Third
- this
- those
- though?
- three
- Through
- Throwing
- TIE
- Ties
- tightening
- time
- timing
- Tipping
- Title
- to
- together
- too
- took
- top
- Total
- tough
- tournament
- Tournaments
- track
- trade
- trademark
- trades
- transit
- transition
- transitioning
- tried
- trigger
- trouble
- true
- truly
- try
- TURN
- Turned
- Turning
- Twitch
- two
- typical
- Ultimately
- understood
- unfortunately
- units
- unleash
- unleashed
- until
- upon
- Upside
- us
- use
- used
- using
- utilized
- valuing
- verge
- Versus
- very
- veteran
- Veterans
- vice
- victory
- vital
- Wall
- wants
- warren
- was
- wasn
- Wave
- waves
- Way..
- ways
- we
- weakness
- WELL
- well-known
- went
- were
- What
- when
- whereas
- which
- while
- WHO
- whole
- will
- win
- window
- winning
- Wins
- Winter
- wiping
- with
- without
- Won
- Work
- work out
- worked
- world
- worry
- worse
- would
- wouldn
- year
- years
- yet
- you
- Youngest
- Your
- youtube
- zephyrnet
- zero


![[BSL17] ProLeague - RO16 Group Stage](https://platoaistream.com/wp-content/uploads/2023/10/bsl17-proleague-ro16-group-stage.png)