I recently agreed to run a 3D printing camp for 8th graders. If you’ve never shared your knowledge with kids, you should. It is a great experience. However, it isn’t without its challenges. One thing I’ve learned: don’t show the kids things that you don’t want them to try to print.
I learned this, of course, the hard way. I have several “flexy”3D prints. You know the kind. Flexy dinosaurs, cats, hedgehogs, and the like. They all have several segments and a little hinge so the segments wobble. The problem is the kids wanted to print their own creations with flexy hinges.
I’ve built a few print-in-place hinges, but not using Tinkercad, the software of choice for the camp. While I was sure it was possible, it seemed daunting to get the class to learn how to do it. Luckily, there’s an easy way to add hinges like this to a Tinkercad design. There was only one problem.
The Video Conundrum
The problem was with YouTube. Many times when we post some “how to” that links to a video, people immediately respond that they don’t want a 10-minute video; they want instructions they can read. It is a fair point, depending on the topic. But I can promise you one thing. Getting a room full of 8th graders to focus on a how-to video for over 90 seconds in the summer is about as difficult as achieving nuclear fusion.
So I did what any reasonable instructor would do: I watched the video, and then I took them through it step-by-step. I had actually suggested they could start with an existing hinged model and simply cut away everything but the hinge. Turns out, it was even easier than that because someone has already done the work for us.
The Thingiverse Connection
If you head over to Thingiverse you can find set of three files that make things easy. There is an 8mm tall hinge with a 1 mm gap. There is also a little 1mm slice you can use to split up your model and a “punch”that removes the material under the hinge.
The first step is to import each file into Tinkercad. You can turn the slice and the punch into holes since that’s how you’ll use them. While you don’t have to, you can go to the Your Creations palette. While there, select each piece one at a time and click “Create Shape” to add each part to your toolbox. Name them something that makes sense to you, like “hinge,” “hinge slice,” and “hinge punch.”
A Simple Demo

Since I have three printers shared among all the students, I wanted something very simple to demonstrate. The path of least resistance was to produce an 8mm thick heart from the “Basic Shapes” palette. Obviously, if we can put a hinge into the heart, you could do anything. I’ll assume the workplane is under the object at all times.
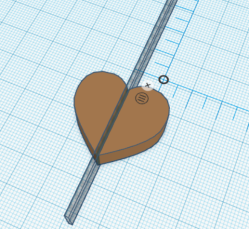
You can center the slice where you want the hinged part. Since the slice is a hole, it doesn’t matter if it is longer or taller than the part. The important parts are that it is 1mm wide and cuts all the way through. Note that Thingiverse recently added “Cruise mode” which means placing the splitter on top of the heart won’t put it down on the workplane like it used to unless you hold the letter C while you place it. I simply put the splitter down by itself and then used the align command to center it with the heart.
Once you group the splitter and the object, you’ll wind up with two halves. For a bigger part, you might want multiple segments, so repeat as necessary.
The next part requires fine positioning, so be sure your grid is set to 0.1mm or even off. You’ll also want to use the arrow keys to precisely move things. Place a hinge down about where you want it on the heart. You can rotate the hinge if you want, but you shouldn’t change the X or Y dimensions.
Make sure the “C” part of the hinge is right at the gap.
” data-medium-file=”https://platoaistream.com/wp-content/uploads/2023/06/hinged-parts-for-the-8th-grade-set-4.png?w=276″ data-large-file=”https://platoaistream.com/wp-content/uploads/2023/06/hinged-parts-for-the-8th-grade-set-4.png?w=276″ decoding=”async” loading=”lazy” class=”size-thumbnail wp-image-600432″ src=”https://platoaistream.com/wp-content/uploads/2023/06/hinged-parts-for-the-8th-grade-set-1.png” alt width=”247″ height=”250″ srcset=”https://platoaistream.com/wp-content/uploads/2023/06/hinged-parts-for-the-8th-grade-set-4.png 276w, https://platoaistream.com/wp-content/uploads/2023/06/hinged-parts-for-the-8th-grade-set-4.png?resize=247,250 247w” sizes=”(max-width: 247px) 100vw, 247px”>
Note that one part of the hinge looks like a letter C. You want the ends of the C to be flush with the gap. Look from several angles to make sure you have it just right.
The next step is to place the punch — another hole — right over the “C” part of the hinge. This needs to be exact. You shouldn’t see any of the underlying part, so make the hinge a contrasting color so you can easily tell. Don’t forget when placing the hinge or the punch about the new cruise mode. Either put the part down on the workplane or hold C while placing the object.
To finish up, all you have to do is select the object and the punch. Don’t select the hinge itself. Then group the item together. The result should look like a hinge. If you see extra pieces, undo, reposition the punch, and try again.
That’s it! If you need more than one hinge, you can do them all at once, or you can do all the punch cut outs in one operation if you are brave.
Results
 The results are great as you can see. The heart is flexible and printed cleanly. While you can’t really see the internals of the hinge, you can imagine what it looks like inside. Or, slice it, and you can see that a bearing captures a pin that rotates inside of it. If you really wanted a custom hinge, maybe Tinkercad isn’t for you.
While you might not think Tinkercad is a good choice for a more sophisticated design, using it to import and modify existing geometries from elsewhere is actually a good strategy. It would have been possible, too, to simply import an entire flexible design from an STL and then cut the hinges out of it. Afterward, you could save it into your custom shapes and use it repeatedly.
If you prefer the video treatment, the original video is below. In addition, [Chuck] has a method to simplify doing multiple hinges you might find interesting. We wondered if we could write a Codeblocks script to help do this in the future, but maybe it is already easy enough.
(Banner image: Flexi Rex from Dr. Lex, one of the most refined flexible T-Rex models we know!)
- SEO Powered Content & PR Distribution. Get Amplified Today.
- EVM Finance. Unified Interface for Decentralized Finance. Access Here.
- Quantum Media Group. IR/PR Amplified. Access Here.
- PlatoAiStream. Web3 Data Intelligence. Knowledge Amplified. Access Here.
- Source: https://hackaday.com/2023/06/16/hinged-parts-for-the-8th-grade-set/
- :has
- :is
- :not
- :where
- $UP
- 1
- 250
- 3d
- 3D Printing
- 8th
- 90
- a
- About
- achieving
- actually
- add
- added
- addition
- again
- align
- All
- already
- also
- among
- an
- and
- Another
- any
- anything
- ARE
- AS
- At
- away
- banner
- BE
- because
- been
- below
- bigger
- brave
- built
- but
- by
- Camp
- CAN
- captures
- Cats
- Center
- challenges
- change
- choice
- class
- click
- color
- content
- could
- course
- creations
- cruise
- custom
- Cut
- cuts
- demonstrate
- Depending
- Design
- DID
- difficult
- dimensions
- Dinosaurs
- do
- Doesn’t
- doing
- done
- Dont
- down
- dr
- each
- easier
- easily
- easy
- either
- elsewhere
- embedded
- ends
- enough
- Entire
- Ether (ETH)
- Even
- everything
- existing
- experience
- extra
- fair
- few
- File
- Files
- Find
- fine
- finish
- First
- flexible
- Focus
- For
- from
- full
- fusion
- future
- gap
- get
- getting
- Go
- good
- grade
- great
- Grid
- Group
- had
- Hard
- Have
- head
- Heart
- help
- Hinge
- hold
- Hole
- Holes
- How
- How To
- However
- HTTPS
- i
- I’LL
- if
- image
- imagine
- immediately
- import
- important
- in
- inside
- instructions
- into
- IT
- ITS
- itself
- jpg
- just
- keys
- kids
- Kind
- Know
- knowledge
- LEARN
- learned
- least
- letter
- like
- links
- little
- longer
- Look
- look like
- LOOKS
- make
- MAKES
- many
- material
- Matter
- max-width
- means
- method
- might
- Mode
- model
- models
- modify
- more
- most
- move
- multiple
- name
- necessary
- Need
- needs
- never
- New
- next
- nuclear
- Nuclear fusion
- object
- of
- off
- on
- once
- ONE
- only
- operation
- or
- original
- out
- over
- own
- palette
- part
- parts
- path
- People
- piece
- pieces
- Pixel
- Place
- placing
- plato
- Plato Data Intelligence
- PlatoData
- Point
- positioning
- possible
- Post
- precisely
- prefer
- printing
- prints
- Problem
- produce
- promise
- punch
- put
- Read
- really
- reasonable
- recently
- refined
- repeat
- REPEATEDLY
- requires
- Resistance
- Respond
- result
- Results
- right
- Room
- Run
- Save
- seconds
- see
- seemed
- segments
- sense
- set
- several
- shapes
- shared
- should
- show
- Simple
- simplify
- simply
- since
- Slice
- So
- Software
- some
- Someone
- something
- sophisticated
- split
- start
- Step
- Strategy
- Students
- summer
- tell
- than
- that
- The
- The Future
- their
- Them
- then
- There.
- they
- thing
- things
- think
- this
- three
- Through
- time
- times
- to
- together
- too
- took
- Toolbox
- top
- topic
- treatment
- true
- try
- TURN
- turns
- two
- under
- underlying
- us
- use
- used
- using
- very
- Video
- want
- wanted
- was
- Way..
- we
- What
- when
- which
- while
- wide
- wind
- with
- without
- Work
- would
- write
- X
- you
- Your
- youtube
- zephyrnet


